在原生模块中发出事件
在某些情况下,你可能希望拥有一个原生模块,它可以监听平台层中的某些事件,然后将这些事件发到 JavaScript 层,从而让你的应用对这些原生事件做出反应。在其他情况下,你可能会有一些长时间运行的操作,它们可以发出事件,以便在这些操作发生时更新 UI。
这两种情况都是从原生模块中发出事件的很好的用例。在本指南中,你将学习如何做到这一点。
当存储中新增一个 key 时发出事件
在这个示例中,你将学习如何在新增一个 key 时发出事件。更改该 key 的值不会触发事件,但新增一个 key 会触发。
本指南从 原生模块 指南开始。 在继续阅读本指南之前,请确保你已熟悉该指南,并且可能已经实现了其中的示例。
第 1 步:更新 NativeLocalStorage 的规范
第一步是更新 NativeLocalStorage 的规范,让 React Native 知道这个模块可以发出事件。
- TypeScript
- Flow
打开 NativeLocalStorage.ts 文件,并按如下方式更新:
+import type {TurboModule, CodegenTypes} from 'react-native';
import {TurboModuleRegistry} from 'react-native';

+export type KeyValuePair = {
+  key: string,
+  value: string,
+}

export interface Spec extends TurboModule {
  setItem(value: string, key: string): void;
  getItem(key: string): string | null;
  removeItem(key: string): void;
  clear(): void;

+ readonly onKeyAdded: CodegenTypes.EventEmitter<KeyValuePair>;
}

export default TurboModuleRegistry.getEnforcing<Spec>(
  'NativeLocalStorage',
);
打开 NativeLocalStorage.js 文件,并按如下方式更新:
// @flow
+import type {TurboModule, CodegenTypes} from 'react-native';
import {TurboModule, TurboModuleRegistry} from 'react-native';

+export type KeyValuePair = {
+  key: string,
+  value: string,
+}

export interface Spec extends TurboModule {
  setItem(value: string, key: string): void;
  getItem(key: string): ?string;
  removeItem(key: string): void;
  clear(): void;
+ onKeyAdded: CodegenTypes.EventEmitter<KeyValuePair>
}
export default (TurboModuleRegistry.get<Spec>(
  'NativeLocalStorage'
): ?Spec);
通过 import type 语句,你从 react-native 中导入了 CodegenTypes,其中包含 EventEmitter 类型。这使你可以使用 CodegenTypes.EventEmitter<KeyValuePair> 来定义 onKeyAdded 属性,指定该事件会发出一个 KeyValuePair 类型的载荷。
当事件被发出时,你预期它会接收一个 KeyValuePair 类型的参数。
第 2 步:生成 Codegen
既然你已经更新了原生模块的规范,现在就需要重新运行 Codegen,以便在原生代码中生成相关产物。
这与原生模块指南中介绍的过程相同。
- Android
- iOS
Codegen 通过 generateCodegenArtifactsFromSchema Gradle 任务执行:
cd android
./gradlew generateCodegenArtifactsFromSchema

BUILD SUCCESSFUL in 837ms
14 actionable tasks: 3 executed, 11 up-to-date
当你构建 Android 应用时,这个过程会自动运行。
Codegen 作为 CocoaPods 自动添加到项目中的脚本阶段的一部分运行。
cd ios
bundle install
bundle exec pod install
输出看起来会像这样:
...
Framework build type is static library
[Codegen] Adding script_phases to ReactCodegen.
[Codegen] Generating ./build/generated/ios/ReactCodegen.podspec.json
[Codegen] Analyzing /Users/me/src/TurboModuleExample/package.json
[Codegen] Searching for Codegen-enabled libraries in the app.
[Codegen] Found TurboModuleExample
[Codegen] Searching for Codegen-enabled libraries in the project dependencies.
[Codegen] Found react-native
...
第 3 步:更新 App 代码
现在,是时候更新应用代码来处理这个新事件了。
打开 App.tsx 文件,并按如下方式修改:
import {
+ Alert,
+ EventSubscription,
  SafeAreaView,
  StyleSheet,
  Text,
  TextInput,
  Button,
} from 'react-native';

import NativeLocalStorage from './specs/NativeLocalStorage';

const EMPTY = '<empty>';

function App(): React.JSX.Element {
  const [value, setValue] = React.useState<string | null>(null);
+ const [key, setKey] = React.useState<string | null>(null);
+ const listenerSubscription = React.useRef<null | EventSubscription>(null);

+ React.useEffect(() => {
+   listenerSubscription.current = NativeLocalStorage?.onKeyAdded((pair) => Alert.alert(`New key added: ${pair.key} with value: ${pair.value}`));
+
+   return  () => {
+     listenerSubscription.current?.remove();
+     listenerSubscription.current = null;
+   }
+ }, [])

  const [editingValue, setEditingValue] = React.useState<
    string | null
  >(null);

- React.useEffect(() => {
-   const storedValue = NativeLocalStorage?.getItem('myKey');
-   setValue(storedValue ?? '');
- }, []);

  function saveValue() {
+   if (key == null) {
+     Alert.alert('Please enter a key');
+     return;
+   }
    NativeLocalStorage?.setItem(editingValue ?? EMPTY, key);
    setValue(editingValue);
  }

  function clearAll() {
    NativeLocalStorage?.clear();
    setValue('');
  }

  function deleteValue() {
+   if (key == null) {
+     Alert.alert('Please enter a key');
+     return;
+   }
    NativeLocalStorage?.removeItem(key);
    setValue('');
  }

+ function retrieveValue() {
+   if (key == null) {
+     Alert.alert('Please enter a key');
+     return;
+   }
+   const val = NativeLocalStorage?.getItem(key);
+   setValue(val);
+ }

  return (
    <SafeAreaView style={{flex: 1}}>
      <Text style={styles.text}>
        Current stored value is: {value ?? 'No Value'}
      </Text>
+     <Text>Key:</Text>
+      <TextInput
+       placeholder="Enter the key you want to store"
+       style={styles.textInput}
+       onChangeText={setKey}
+     />
+     <Text>Value:</Text>
      <TextInput
        placeholder="Enter the text you want to store"
        style={styles.textInput}
        onChangeText={setEditingValue}
      />
      <Button title="Save" onPress={saveValue} />
+     <Button title="Retrieve" onPress={retrieveValue} />
      <Button title="Delete" onPress={deleteValue} />
      <Button title="Clear" onPress={clearAll} />
    </SafeAreaView>
  );
}

const styles = StyleSheet.create({
  text: {
    margin: 10,
    fontSize: 20,
  },
  textInput: {
    margin: 10,
    height: 40,
    borderColor: 'black',
    borderWidth: 1,
    paddingLeft: 5,
    paddingRight: 5,
    borderRadius: 5,
  },
});

export default App;
有几个相关的改动值得关注:
- 你需要从
react-native导入EventSubscription类型来处理EventSubscription - 你需要使用
useRef来跟踪EventSubscription引用 - 你通过
useEffectHook 注册监听器。onKeyAdded函数接收一个参数为KeyValuePair类型对象的回调函数。 - 添加到
onKeyAdded的回调会在事件从 Native 发到 JS 的每一次触发时执行。 - 在
useEffect的清理函数中,你需要remove事件订阅,并将 ref 设为null。
其余改动都是普通的 React 改动,用于让这个应用更适配这个新功能。
第 4 步:编写原生代码
一切准备就绪后,我们开始编写原生平台代码。
- Android
- iOS
假设你已经按照 原生模块指南 中针对 Android 的说明完成了操作,那么剩下要做的就是把发出事件的代码接入到你的应用中。
为此,你需要:
- 打开
NativeLocalStorage.kt文件 - 按如下方式修改它:
package com.nativelocalstorage

import android.content.Context
import android.content.SharedPreferences
import com.nativelocalstorage.NativeLocalStorageSpec
+import com.facebook.react.bridge.Arguments
import com.facebook.react.bridge.ReactApplicationContext
+import com.facebook.react.bridge.WritableMap

class NativeLocalStorageModule(reactContext: ReactApplicationContext) : NativeLocalStorageSpec(reactContext) {

  override fun getName() = NAME

  override fun setItem(value: String, key: String) {
+   var shouldEmit = false
+   if (getItem(key) != null) {
+       shouldEmit = true
+   }
    val sharedPref = getReactApplicationContext().getSharedPreferences("my_prefs", Context.MODE_PRIVATE)
    val editor = sharedPref.edit()
    editor.putString(key, value)
    editor.apply()

+   if (shouldEmit == true) {
+       val eventData = Arguments.createMap().apply {
+           putString("key", key)
+           putString("value", value)
+       }
+       emitOnKeyAdded(eventData)
+   }
  }

  override fun getItem(key: String): String? {
    val sharedPref = getReactApplicationContext().getSharedPreferences("my_prefs", Context.MODE_PRIVATE)
    val username = sharedPref.getString(key, null)
    return username.toString()
  }
首先,你需要导入几个你需要用来创建要从 Native 发送到 JS 的 eventData 的类型。这些导入是:
import com.facebook.react.bridge.Argumentsimport com.facebook.react.bridge.WritableMap
其次,你需要实现实际将事件发到 JS 的逻辑。对于像规范中定义的 KeyValuePair 这样的复杂类型,Codegen 会生成一个期望以 ReadableMap 作为参数的函数。你可以使用 Arguments.createMap() 工厂方法创建 ReadableMap,并使用 apply 函数来填充这个 map。你有责任确保你在 map 中使用的 key 与 JS 规范类型中定义的属性完全一致。
假设你已经按照 原生模块指南 中针对 iOS 的说明完成了操作,那么剩下要做的就是把发出事件的代码接入到你的应用中。
为此,你需要:
- 打开
RCTNativeLocalStorage.h文件。 - 将基类从
NSObject改为NativeLocalStorageSpecBase
#import <Foundation/Foundation.h>
#import <NativeLocalStorageSpec/NativeLocalStorageSpec.h>

NS_ASSUME_NONNULL_BEGIN

-@interface RCTNativeLocalStorage : NSObject <NativeLocalStorageSpec>
+@interface RCTNativeLocalStorage : NativeLocalStorageSpecBase <NativeLocalStorageSpec>

@end

NS_ASSUME_NONNULL_END
- 打开
RCTNativeLocalStorage.mm文件。 - 按需修改它以在需要时发出事件,例如:
 - (void)setItem:(NSString *)value key:(NSString *)key {
+  BOOL shouldEmitEvent = NO;
+  if (![self getItem:key]) {
+    shouldEmitEvent = YES;
+  }
   [self.localStorage setObject:value forKey:key];

+  if (shouldEmitEvent) {
+    [self emitOnKeyAdded:@{@"key": key, @"value": value}];
+  }
}
NativeLocalStorageSpecBase 是一个基类,它提供了 emitOnKeyAdded 方法及其基础实现和样板代码。得益于这个类,你不必处理将事件发送到 JS 所需的 Objective-C 和 JSI 之间的所有转换。
对于像规范中定义的 KeyValuePair 这样的复杂类型,Codegen 会在原生侧生成一个你可以填充的通用字典。你有责任确保你在字典中使用的 key 与 JS 规范类型中定义的属性完全一致。
第 5 步:运行你的应用
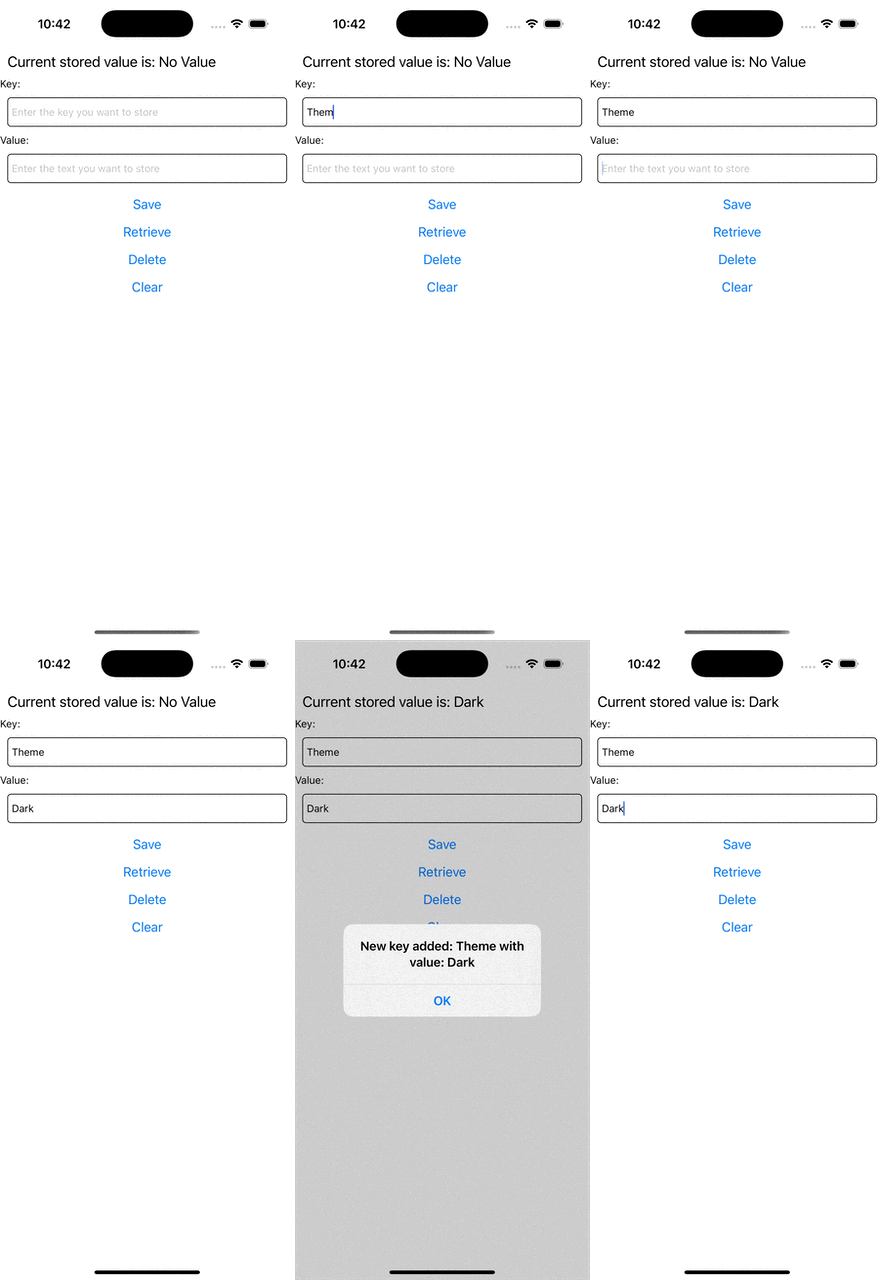
如果你现在尝试运行你的应用,你应该会看到以下行为。
 |  |