Fabric Native Components: iOS
现在是时候编写一些 iOS 平台代码,以便能够渲染网页视图了。你需要遵循以下步骤:
- 运行 Codegen
- 为
RCTWebView编写代码 - 在应用中注册
RCTWebView
1. 运行 Codegen
你可以手动运行 Codegen,不过更简单的方法是使用你要演示该组件的应用来为你完成此操作。
cd ios
bundle install
bundle exec pod install
请务必注意,你将看到 Codegen 的日志输出,我们将在 Xcode 中使用这些输出构建 WebView 原生组件。
你应该谨慎决定是否将生成的代码提交到代码仓库。生成的代码特定于每个 React Native 版本。使用 npm peerDependencies 来限制与 React Native 版本的兼容性。
3. 编写 RCTWebView
我们需要通过完成以下 5 个步骤,使用 Xcode 准备你的 iOS 项目:
- 打开 CocoaPods 生成的 Xcode Workspace:
cd ios
open Demo.xcworkspace
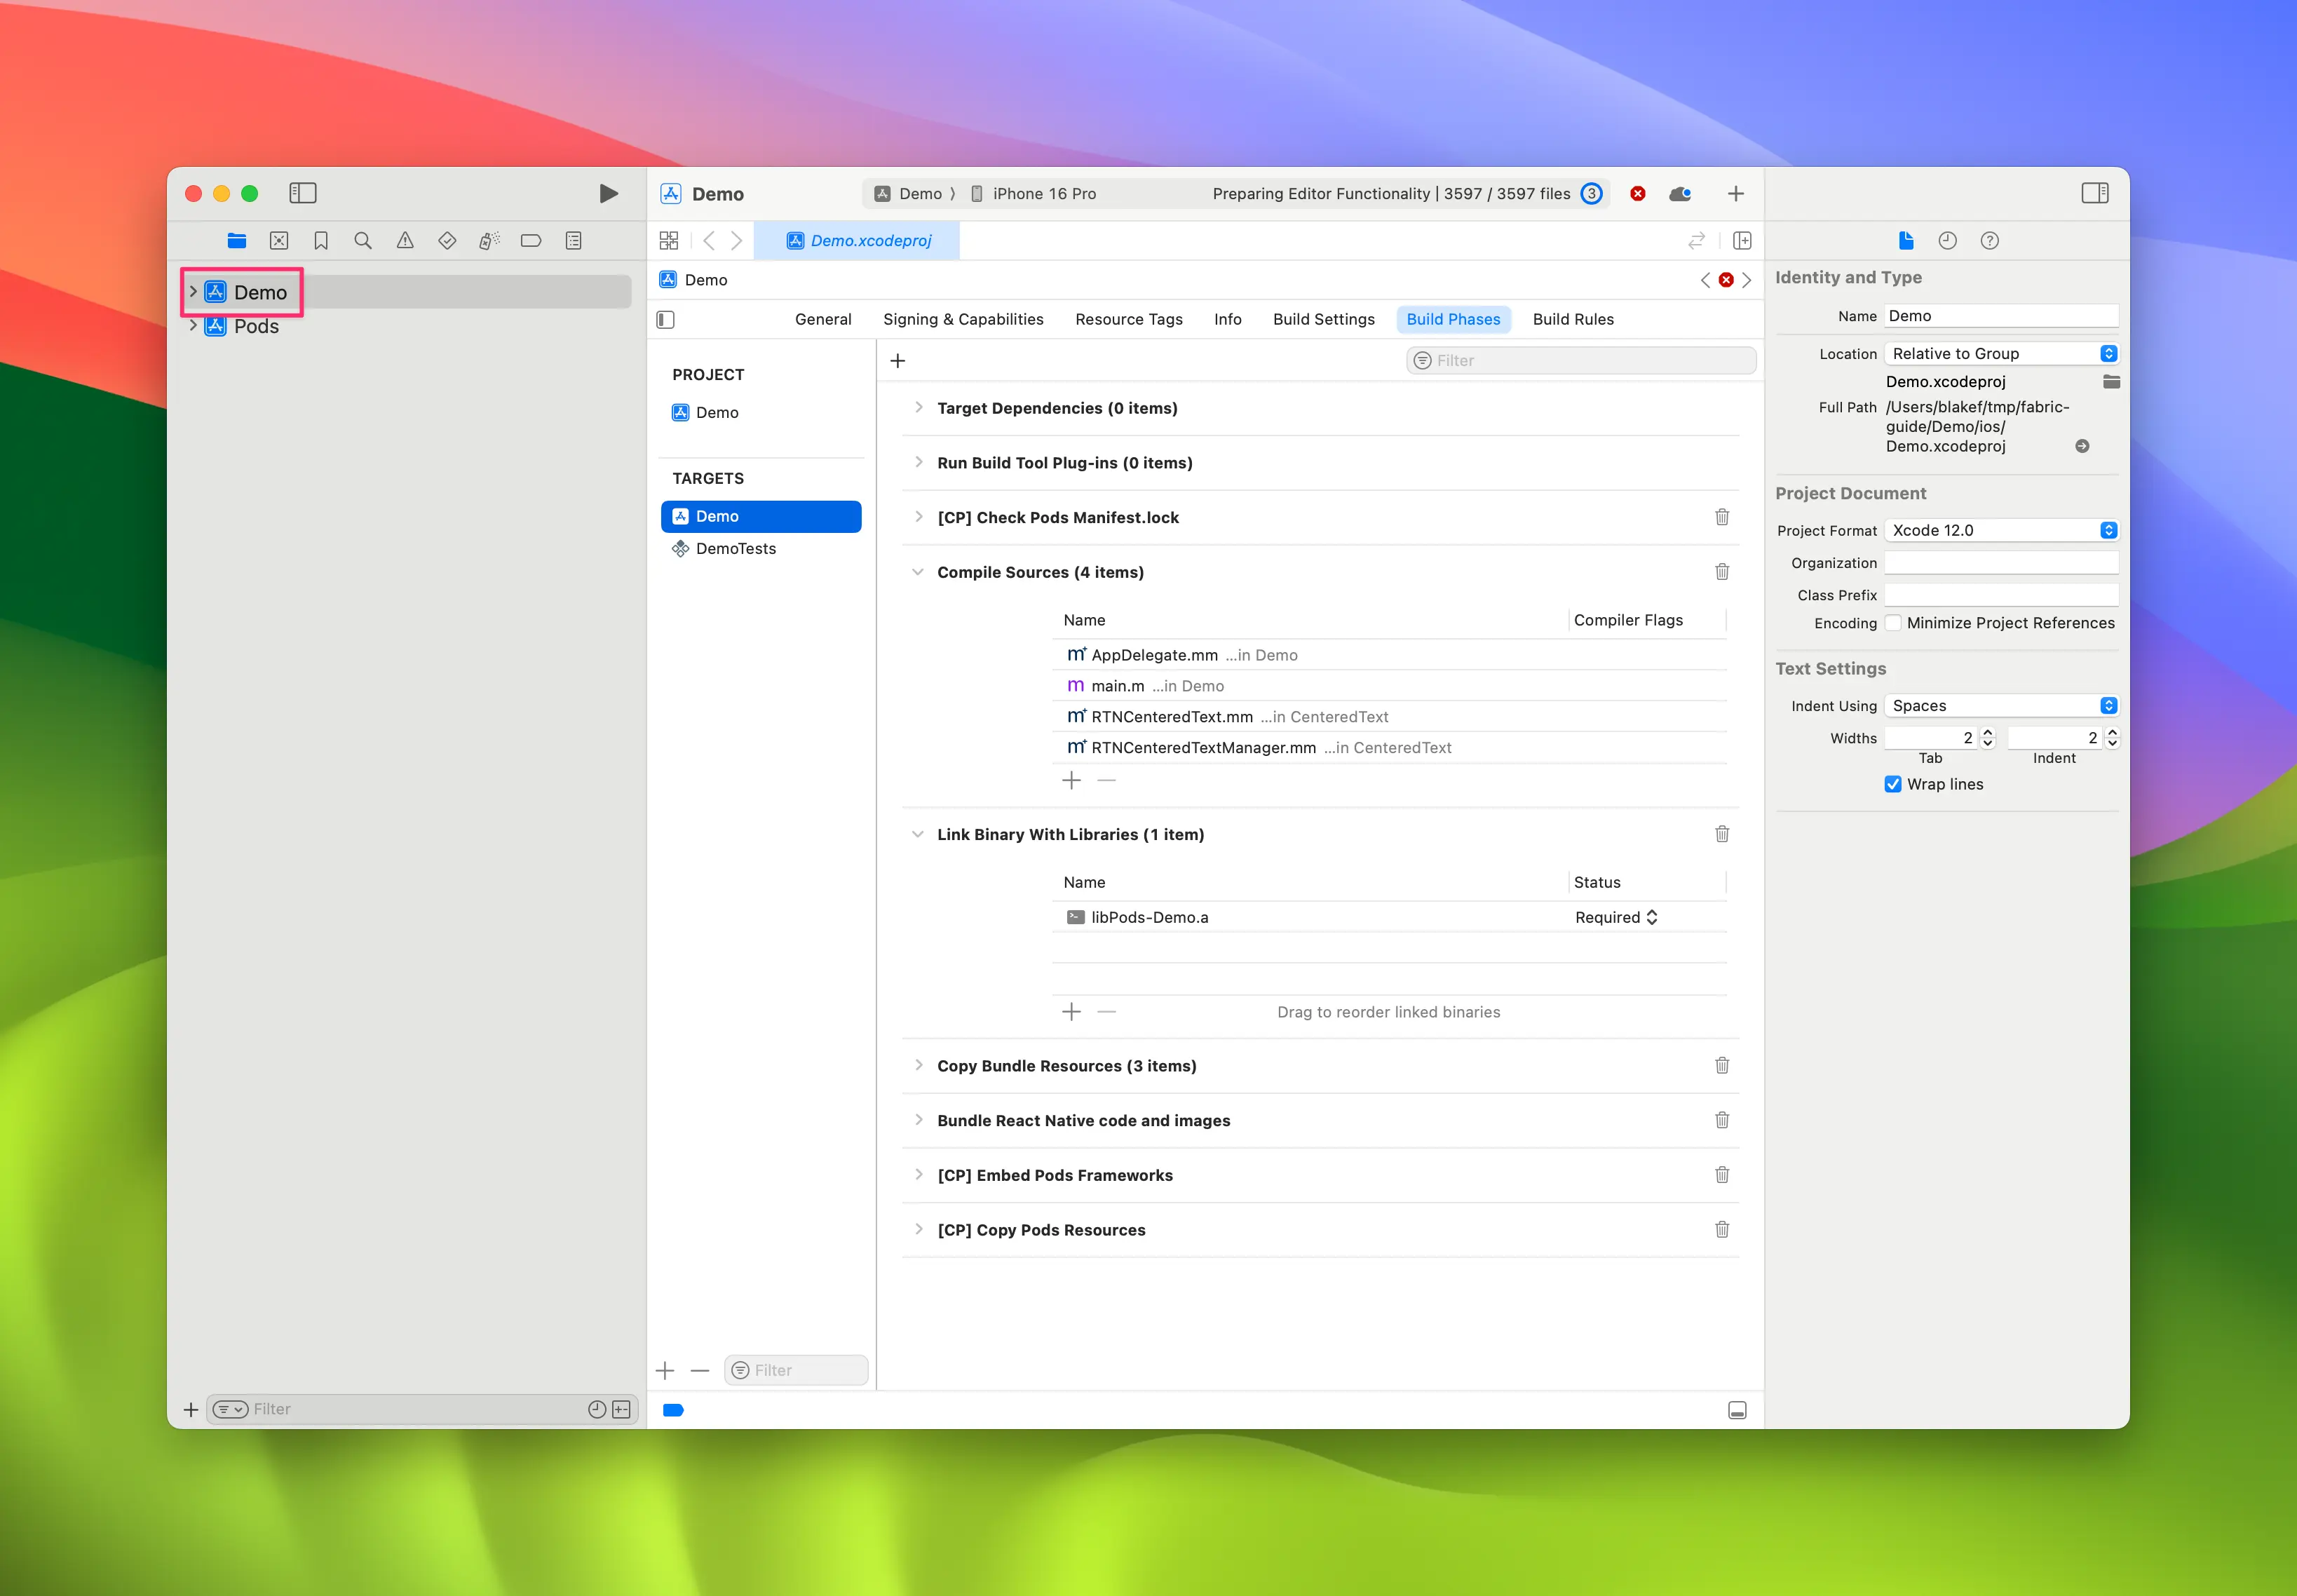
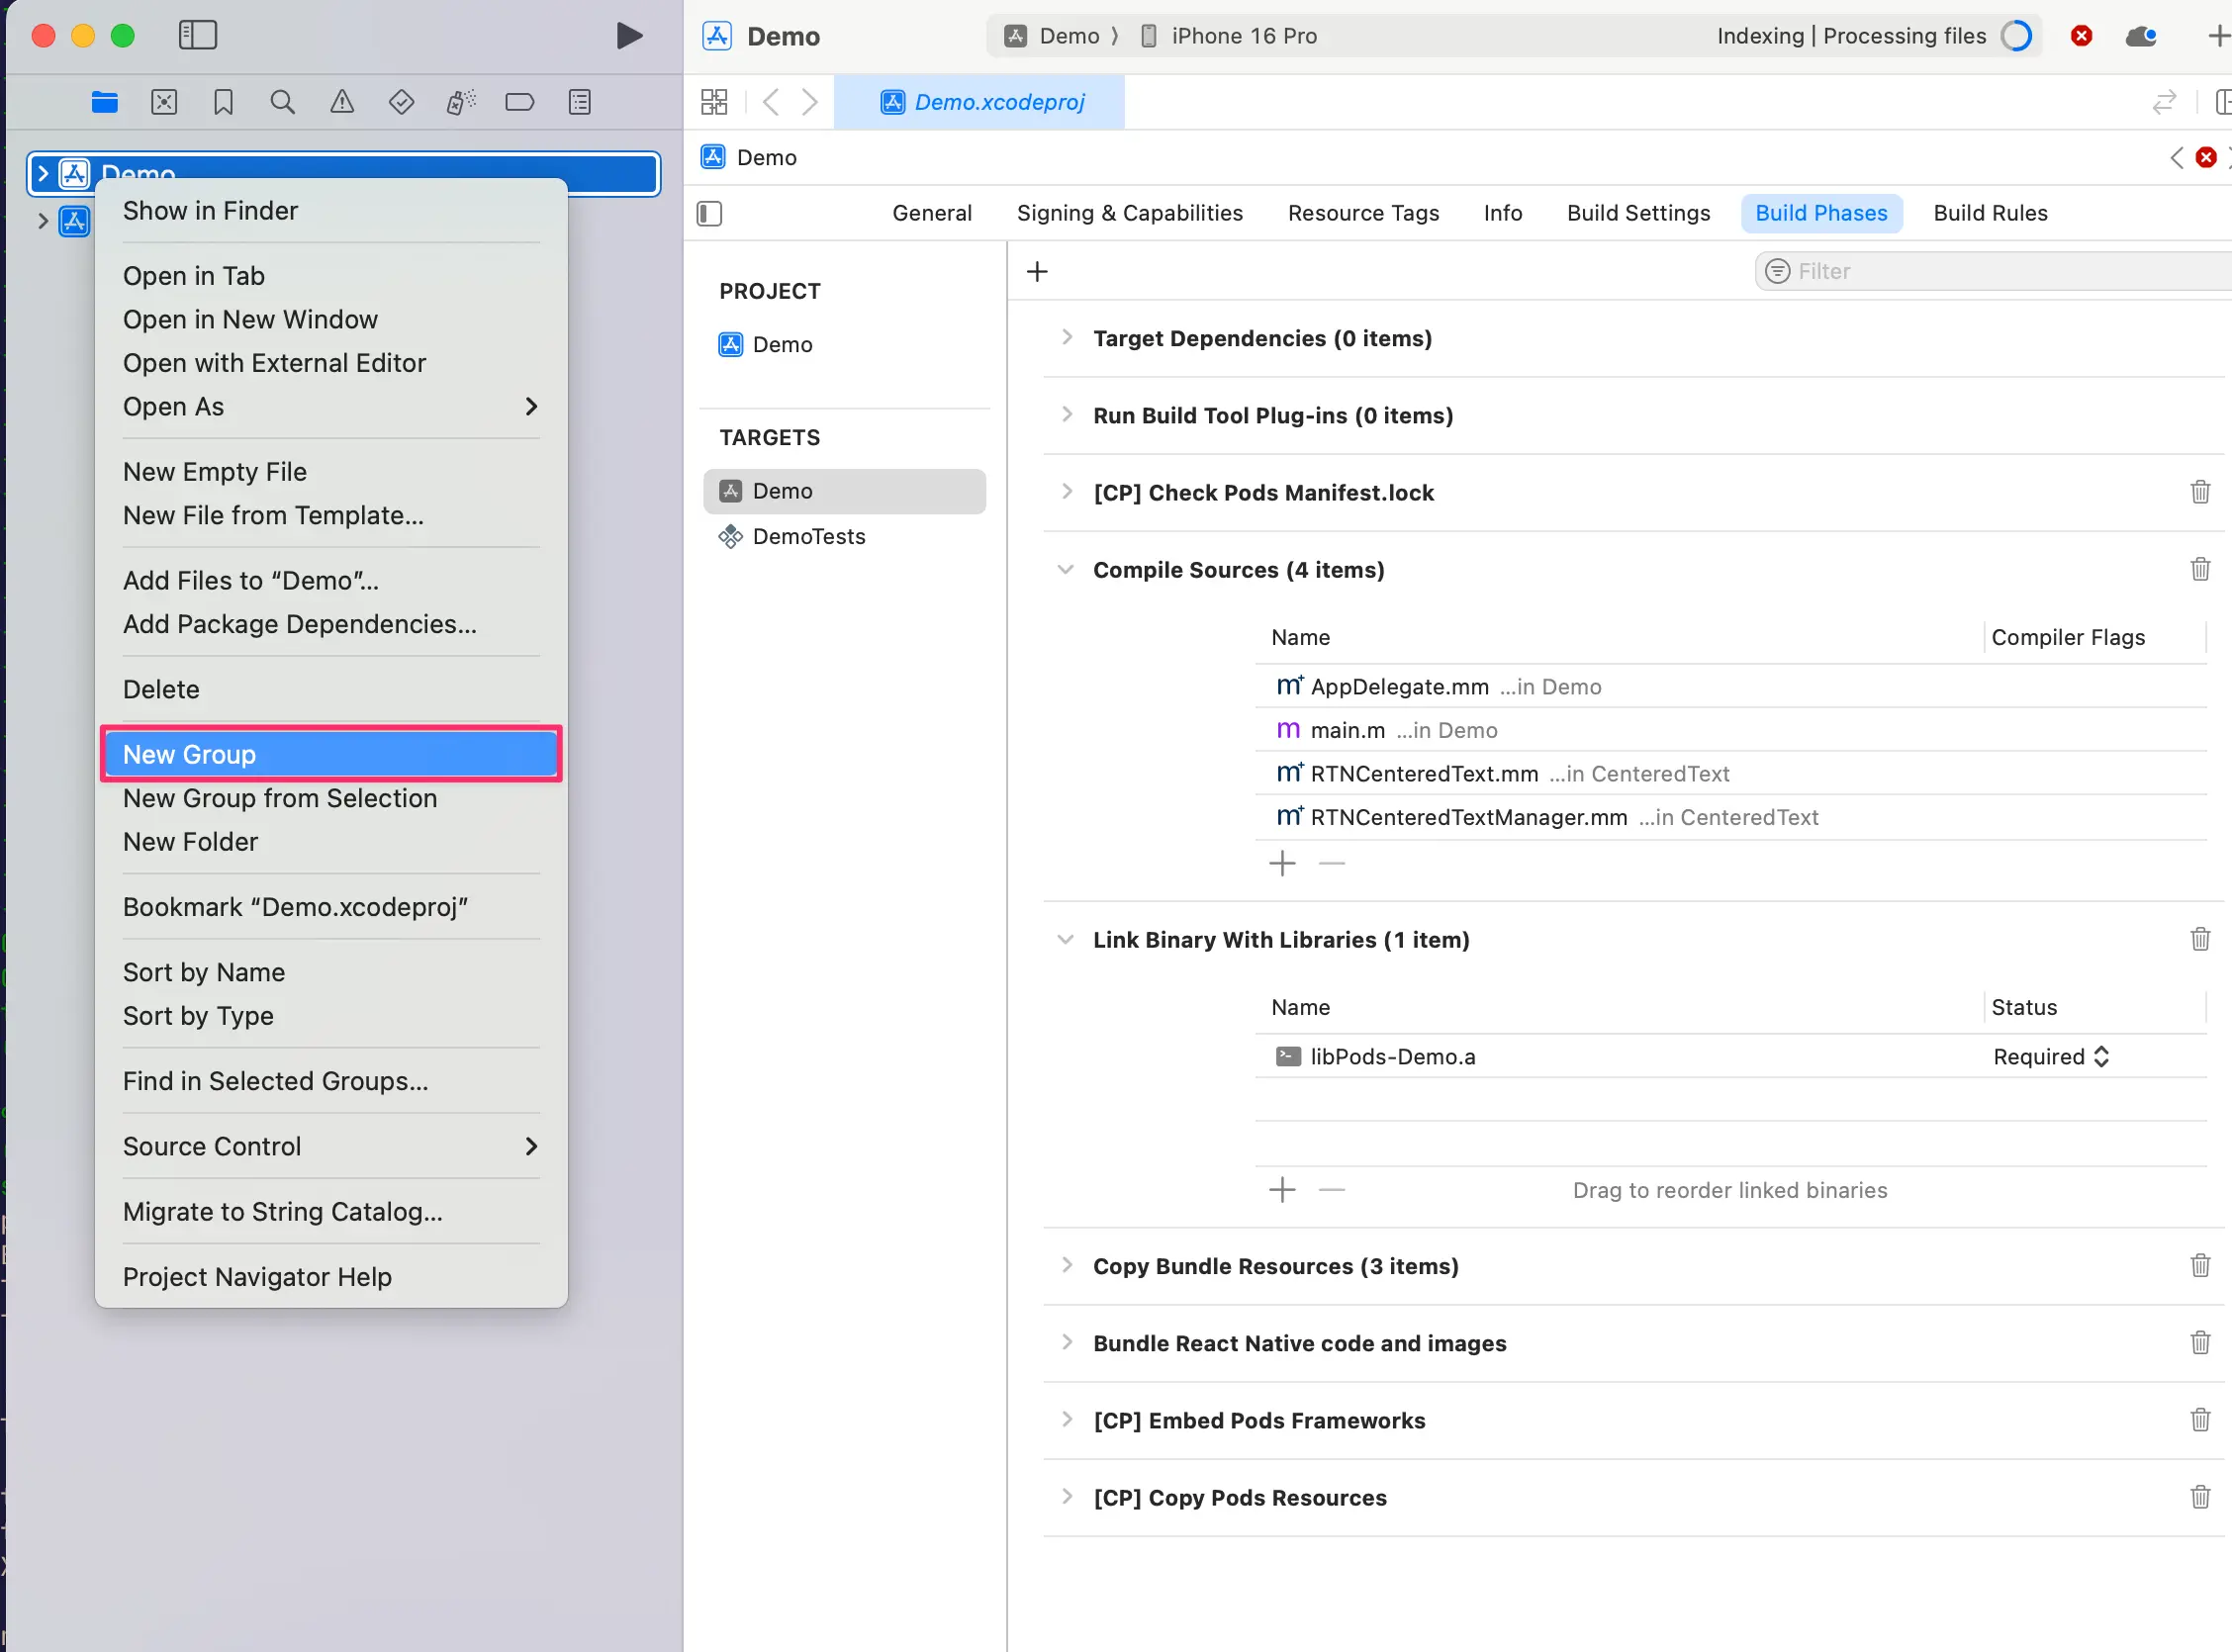
- 右键点击 app,然后选择
New Group,将新分组命名为WebView。
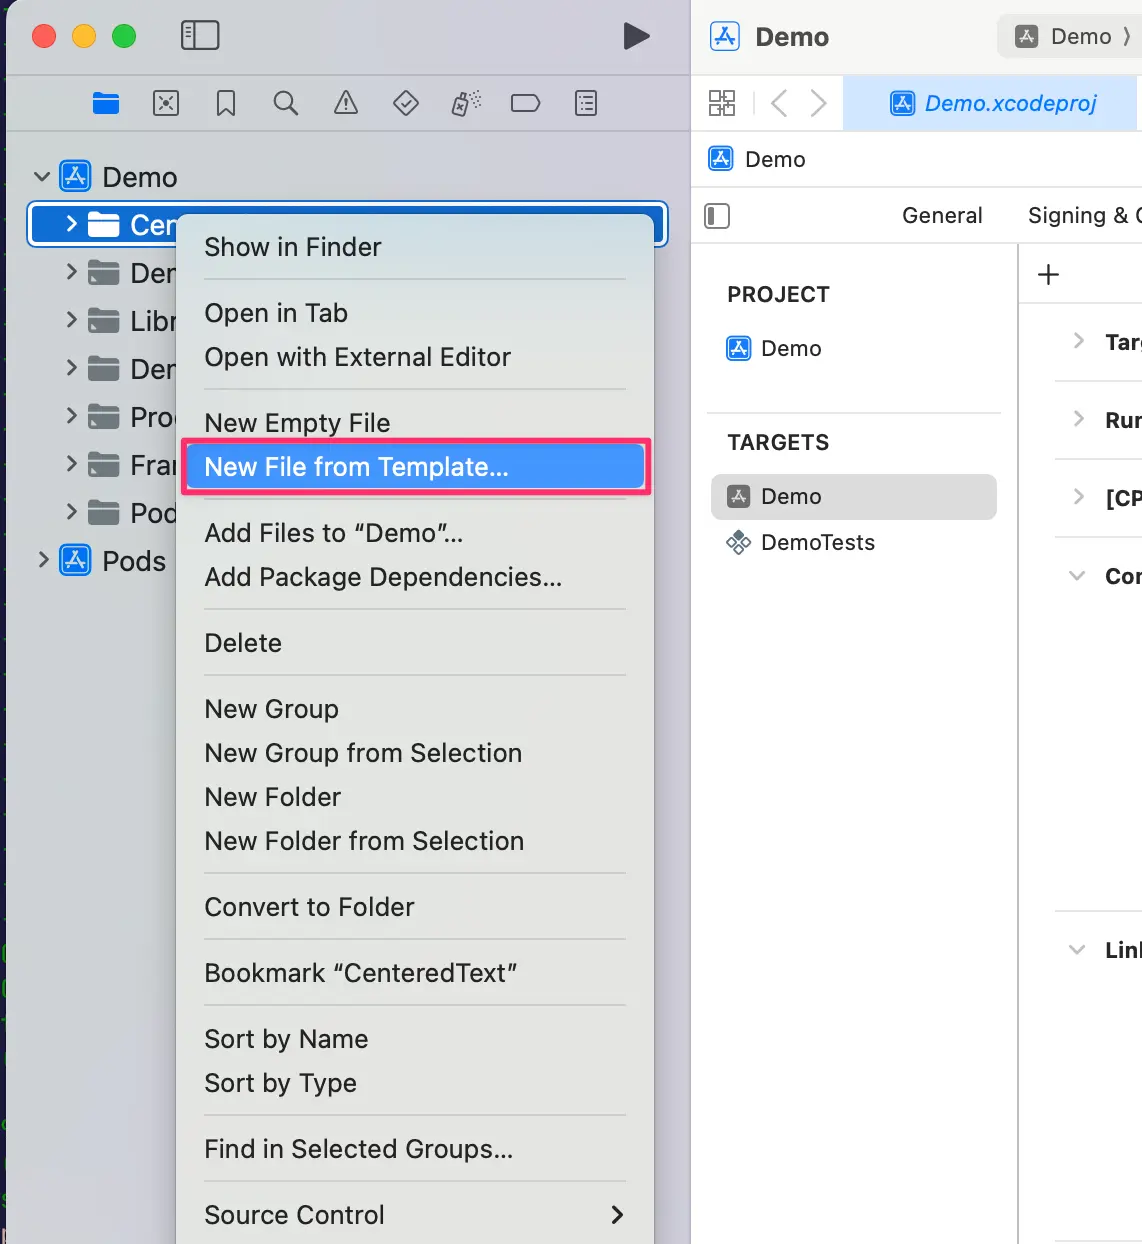
- 在
WebView分组中,创建New→File from Template。
- 使用
Objective-C File模板,并将其命名为RCTWebView。
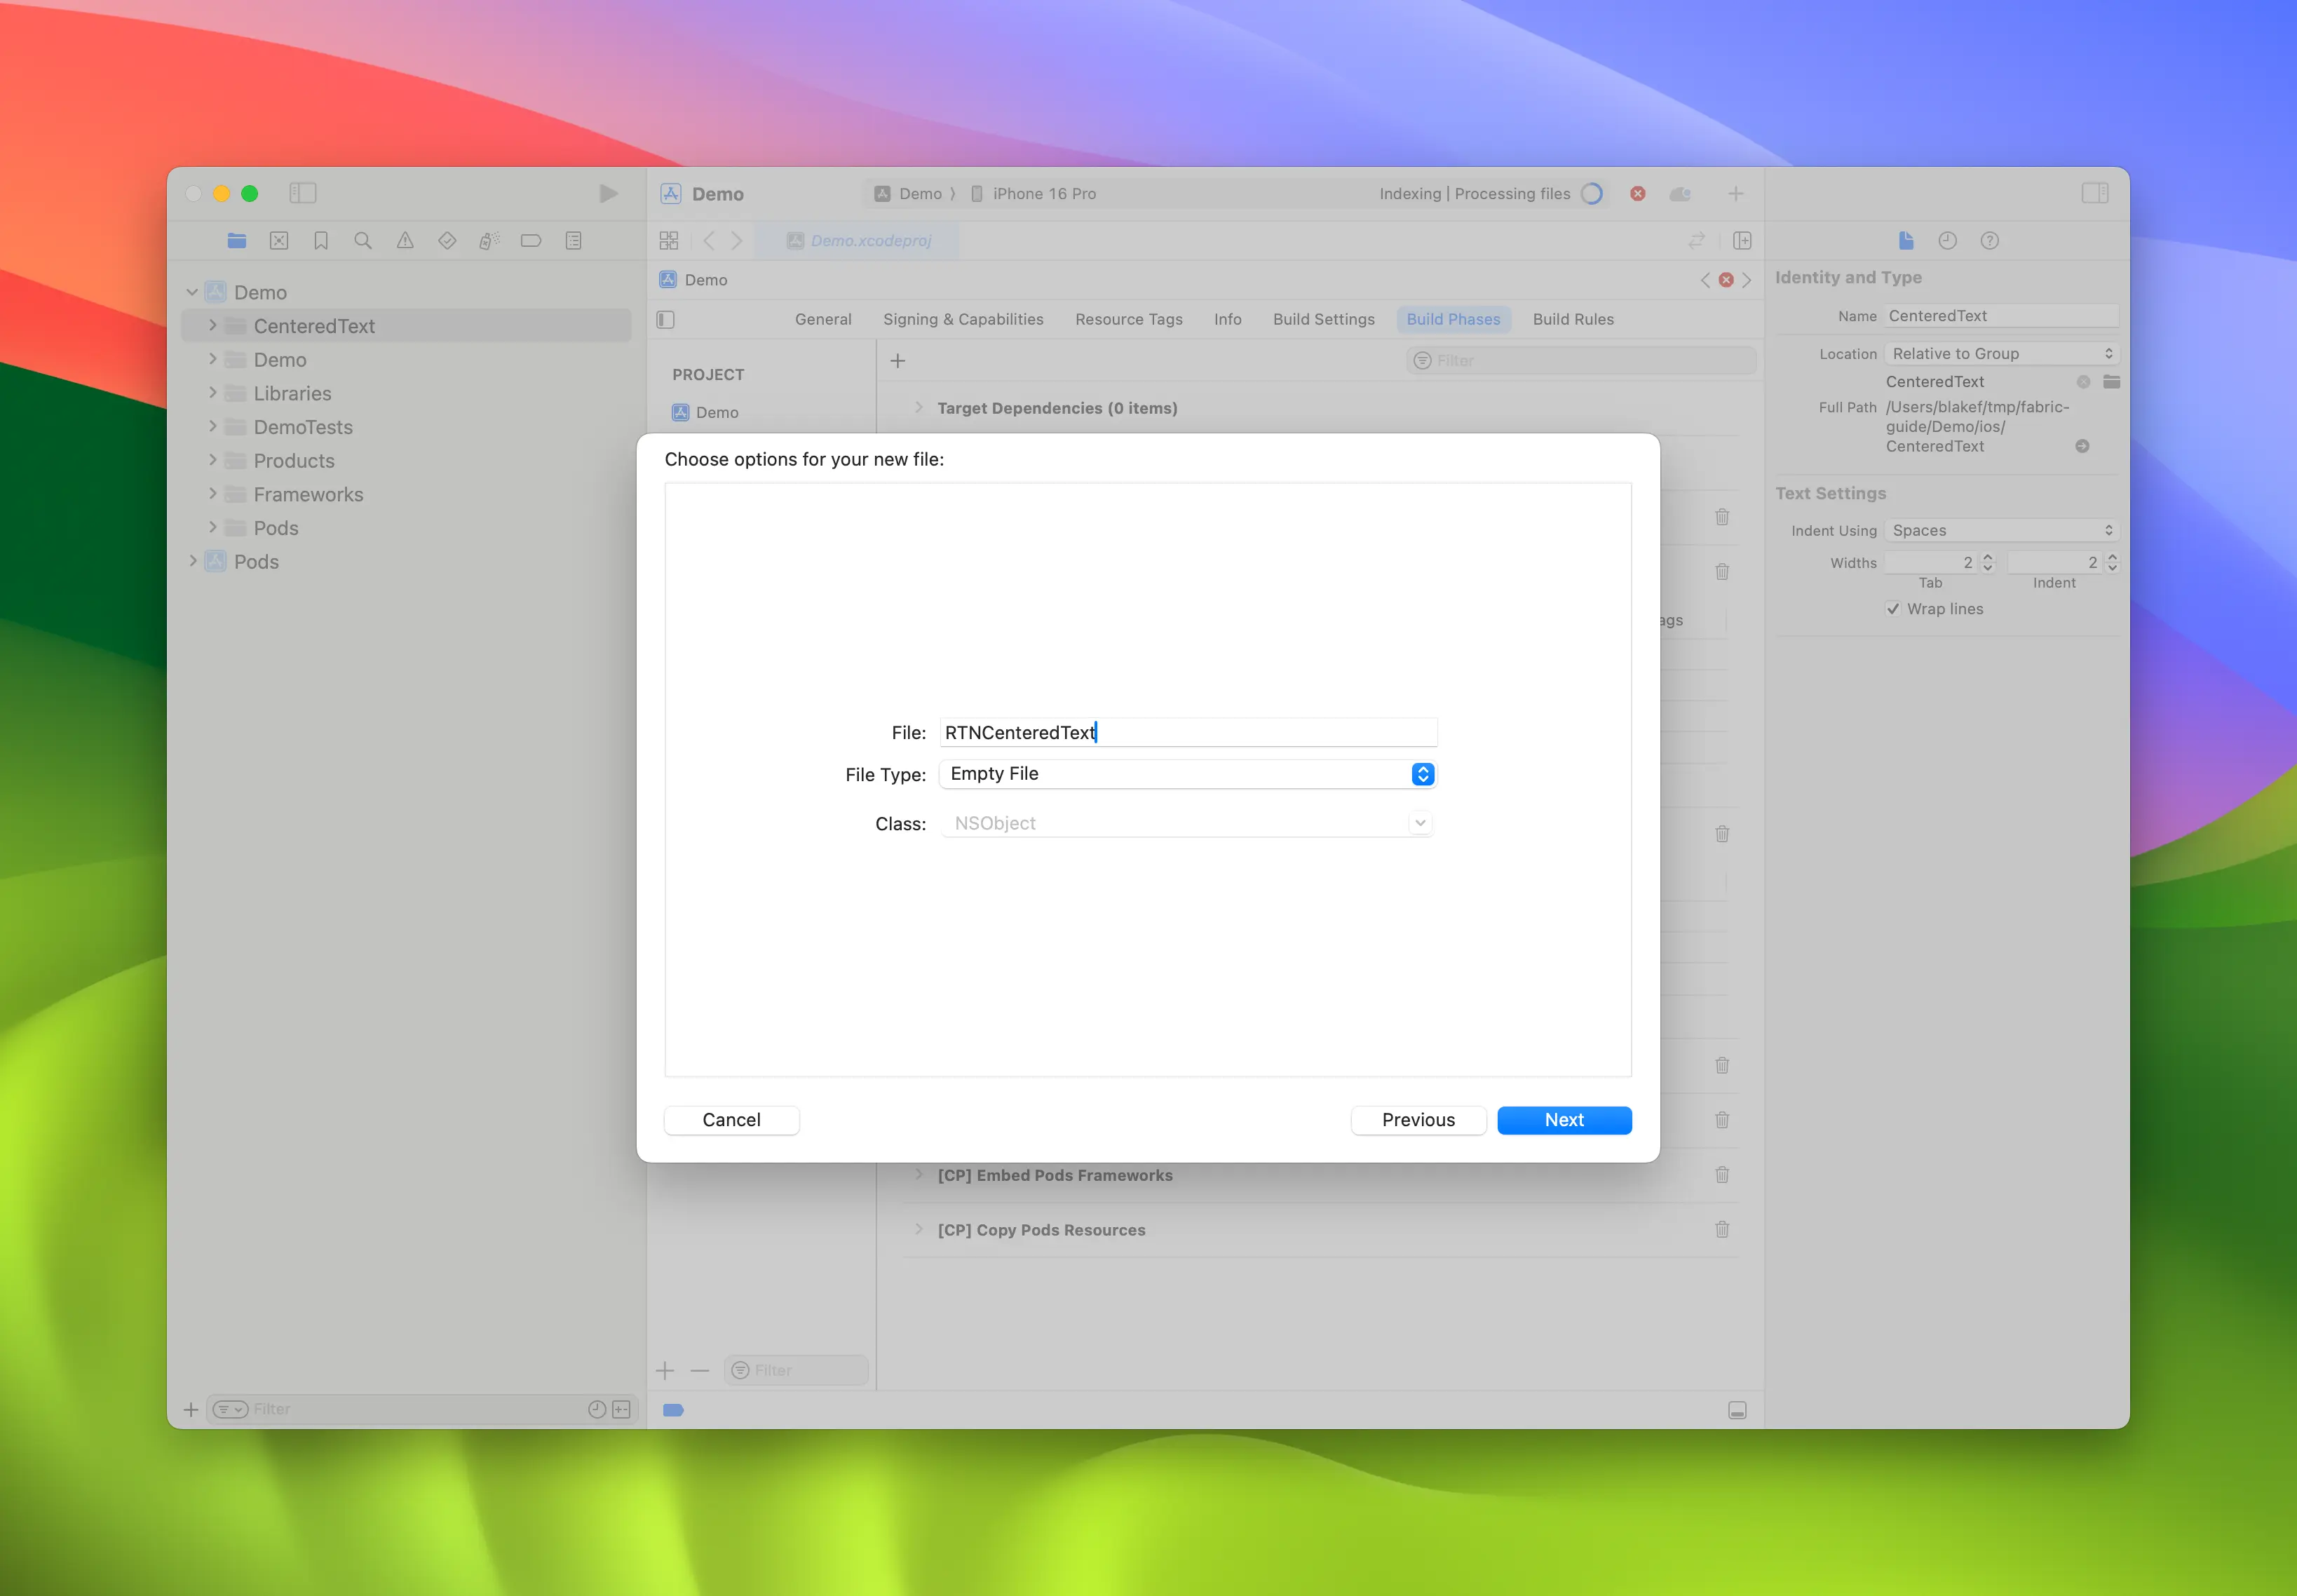
-
重复步骤 4,创建名为
RCTWebView.h的头文件。 -
将
RCTWebView.m重命名为RCTWebView.mm,使其成为 Objective-C++ 文件。
Podfile
...
Demo
├── AppDelegate.swift
...
├── RCTWebView.h
└── RCTWebView.mm
创建头文件和实现文件后,就可以开始实现它们了。
以下是 RCTWebView.h 文件的代码,该文件声明了组件接口。
#import <React/RCTViewComponentView.h>
#import <UIKit/UIKit.h>

NS_ASSUME_NONNULL_BEGIN

@interface RCTWebView : RCTViewComponentView

// You would declare native methods you'd want to access from the view here

@end

NS_ASSUME_NONNULL_END
此类定义了一个 RCTWebView,它扩展了 RCTViewComponentView 类。这是所有原生组件的基类,由 React Native 提供。
实现文件(RCTWebView.mm)的代码如下:
#import "RCTWebView.h"

#import <react/renderer/components/AppSpec/ComponentDescriptors.h>
#import <react/renderer/components/AppSpec/EventEmitters.h>
#import <react/renderer/components/AppSpec/Props.h>
#import <react/renderer/components/AppSpec/RCTComponentViewHelpers.h>
#import <WebKit/WebKit.h>

using namespace facebook::react;

@interface RCTWebView () <RCTCustomWebViewViewProtocol, WKNavigationDelegate>
@end

@implementation RCTWebView {
  NSURL * _sourceURL;
  WKWebView * _webView;
}

-(instancetype)init
{
  if(self = [super init]) {
    _webView = [WKWebView new];
    _webView.navigationDelegate = self;
    [self addSubview:_webView];
  }
  return self;
}

- (void)updateProps:(Props::Shared const &)props oldProps:(Props::Shared const &)oldProps
{
  const auto &oldViewProps = *std::static_pointer_cast<CustomWebViewProps const>(_props);
  const auto &newViewProps = *std::static_pointer_cast<CustomWebViewProps const>(props);

  // Handle your props here
  if (oldViewProps.sourceURL != newViewProps.sourceURL) {
    NSString *urlString = [NSString stringWithCString:newViewProps.sourceURL.c_str() encoding:NSUTF8StringEncoding];
    _sourceURL = [NSURL URLWithString:urlString];
    if ([self urlIsValid:newViewProps.sourceURL]) {
      [_webView loadRequest:[NSURLRequest requestWithURL:_sourceURL]];
    }
  }

  [super updateProps:props oldProps:oldProps];
}

-(void)layoutSubviews
{
  [super layoutSubviews];
  _webView.frame = self.bounds;

}

#pragma mark - WKNavigationDelegate

-(void)webView:(WKWebView *)webView didFinishNavigation:(WKNavigation *)navigation
{
  CustomWebViewEventEmitter::OnScriptLoaded result = CustomWebViewEventEmitter::OnScriptLoaded{CustomWebViewEventEmitter::OnScriptLoadedResult::Success};
  self.eventEmitter.onScriptLoaded(result);
}

- (BOOL)urlIsValid:(std::string)propString
{
  if (propString.length() > 0 && !_sourceURL) {
    CustomWebViewEventEmitter::OnScriptLoaded result = CustomWebViewEventEmitter::OnScriptLoaded{CustomWebViewEventEmitter::OnScriptLoadedResult::Error};

    self.eventEmitter.onScriptLoaded(result);
    return NO;
  }
  return YES;
}

// Event emitter convenience method
- (const CustomWebViewEventEmitter &)eventEmitter
{
  return static_cast<const CustomWebViewEventEmitter &>(*_eventEmitter);
}

+ (ComponentDescriptorProvider)componentDescriptorProvider
{
  return concreteComponentDescriptorProvider<CustomWebViewComponentDescriptor>();
}

@end
此代码使用 Objective-C++ 编写,其中包含以下各种细节:
@interface实现了两个协议:- 由 Codegen 生成的
RCTCustomWebViewViewProtocol - 由 WebKit 框架提供、用于处理网页视图导航事件的
WKNavigationDelegate
- 由 Codegen 生成的
init方法实例化WKWebView,将其添加到子视图中,并设置navigationDelegate- React Native 在组件的 props 发生变化时调用的
updateProps方法 - 描述自定义视图应如何布局的
layoutSubviews方法 webView:didFinishNavigation:方法,用于处理WKWebView完成页面加载后的操作urlIsValid:(std::string)propString方法,用于检查作为 prop 接收的 URL 是否有效eventEmitter方法,这是一个用于获取强类型eventEmitter实例的实用方法componentDescriptorProvider,用于返回由 Codegen 生成的ComponentDescriptor
添加 WebKit 框架
此步骤仅因为我们正在创建 Web 视图而需要。iOS 上的 Web 组件需要链接到 Apple 提供的 WebKit 框架。如果你的组件不需要访问 Web 专属功能,则可以跳过此步骤。
Web 视图需要访问一些由 Apple 通过随 Xcode 和设备附带的框架之一提供的功能:WebKit。
你可以在 RCTWebView.mm 中添加的 #import <WebKit/WebKit.h> 行看到它。
要在应用中链接 WebKit 框架,请按照以下步骤操作:
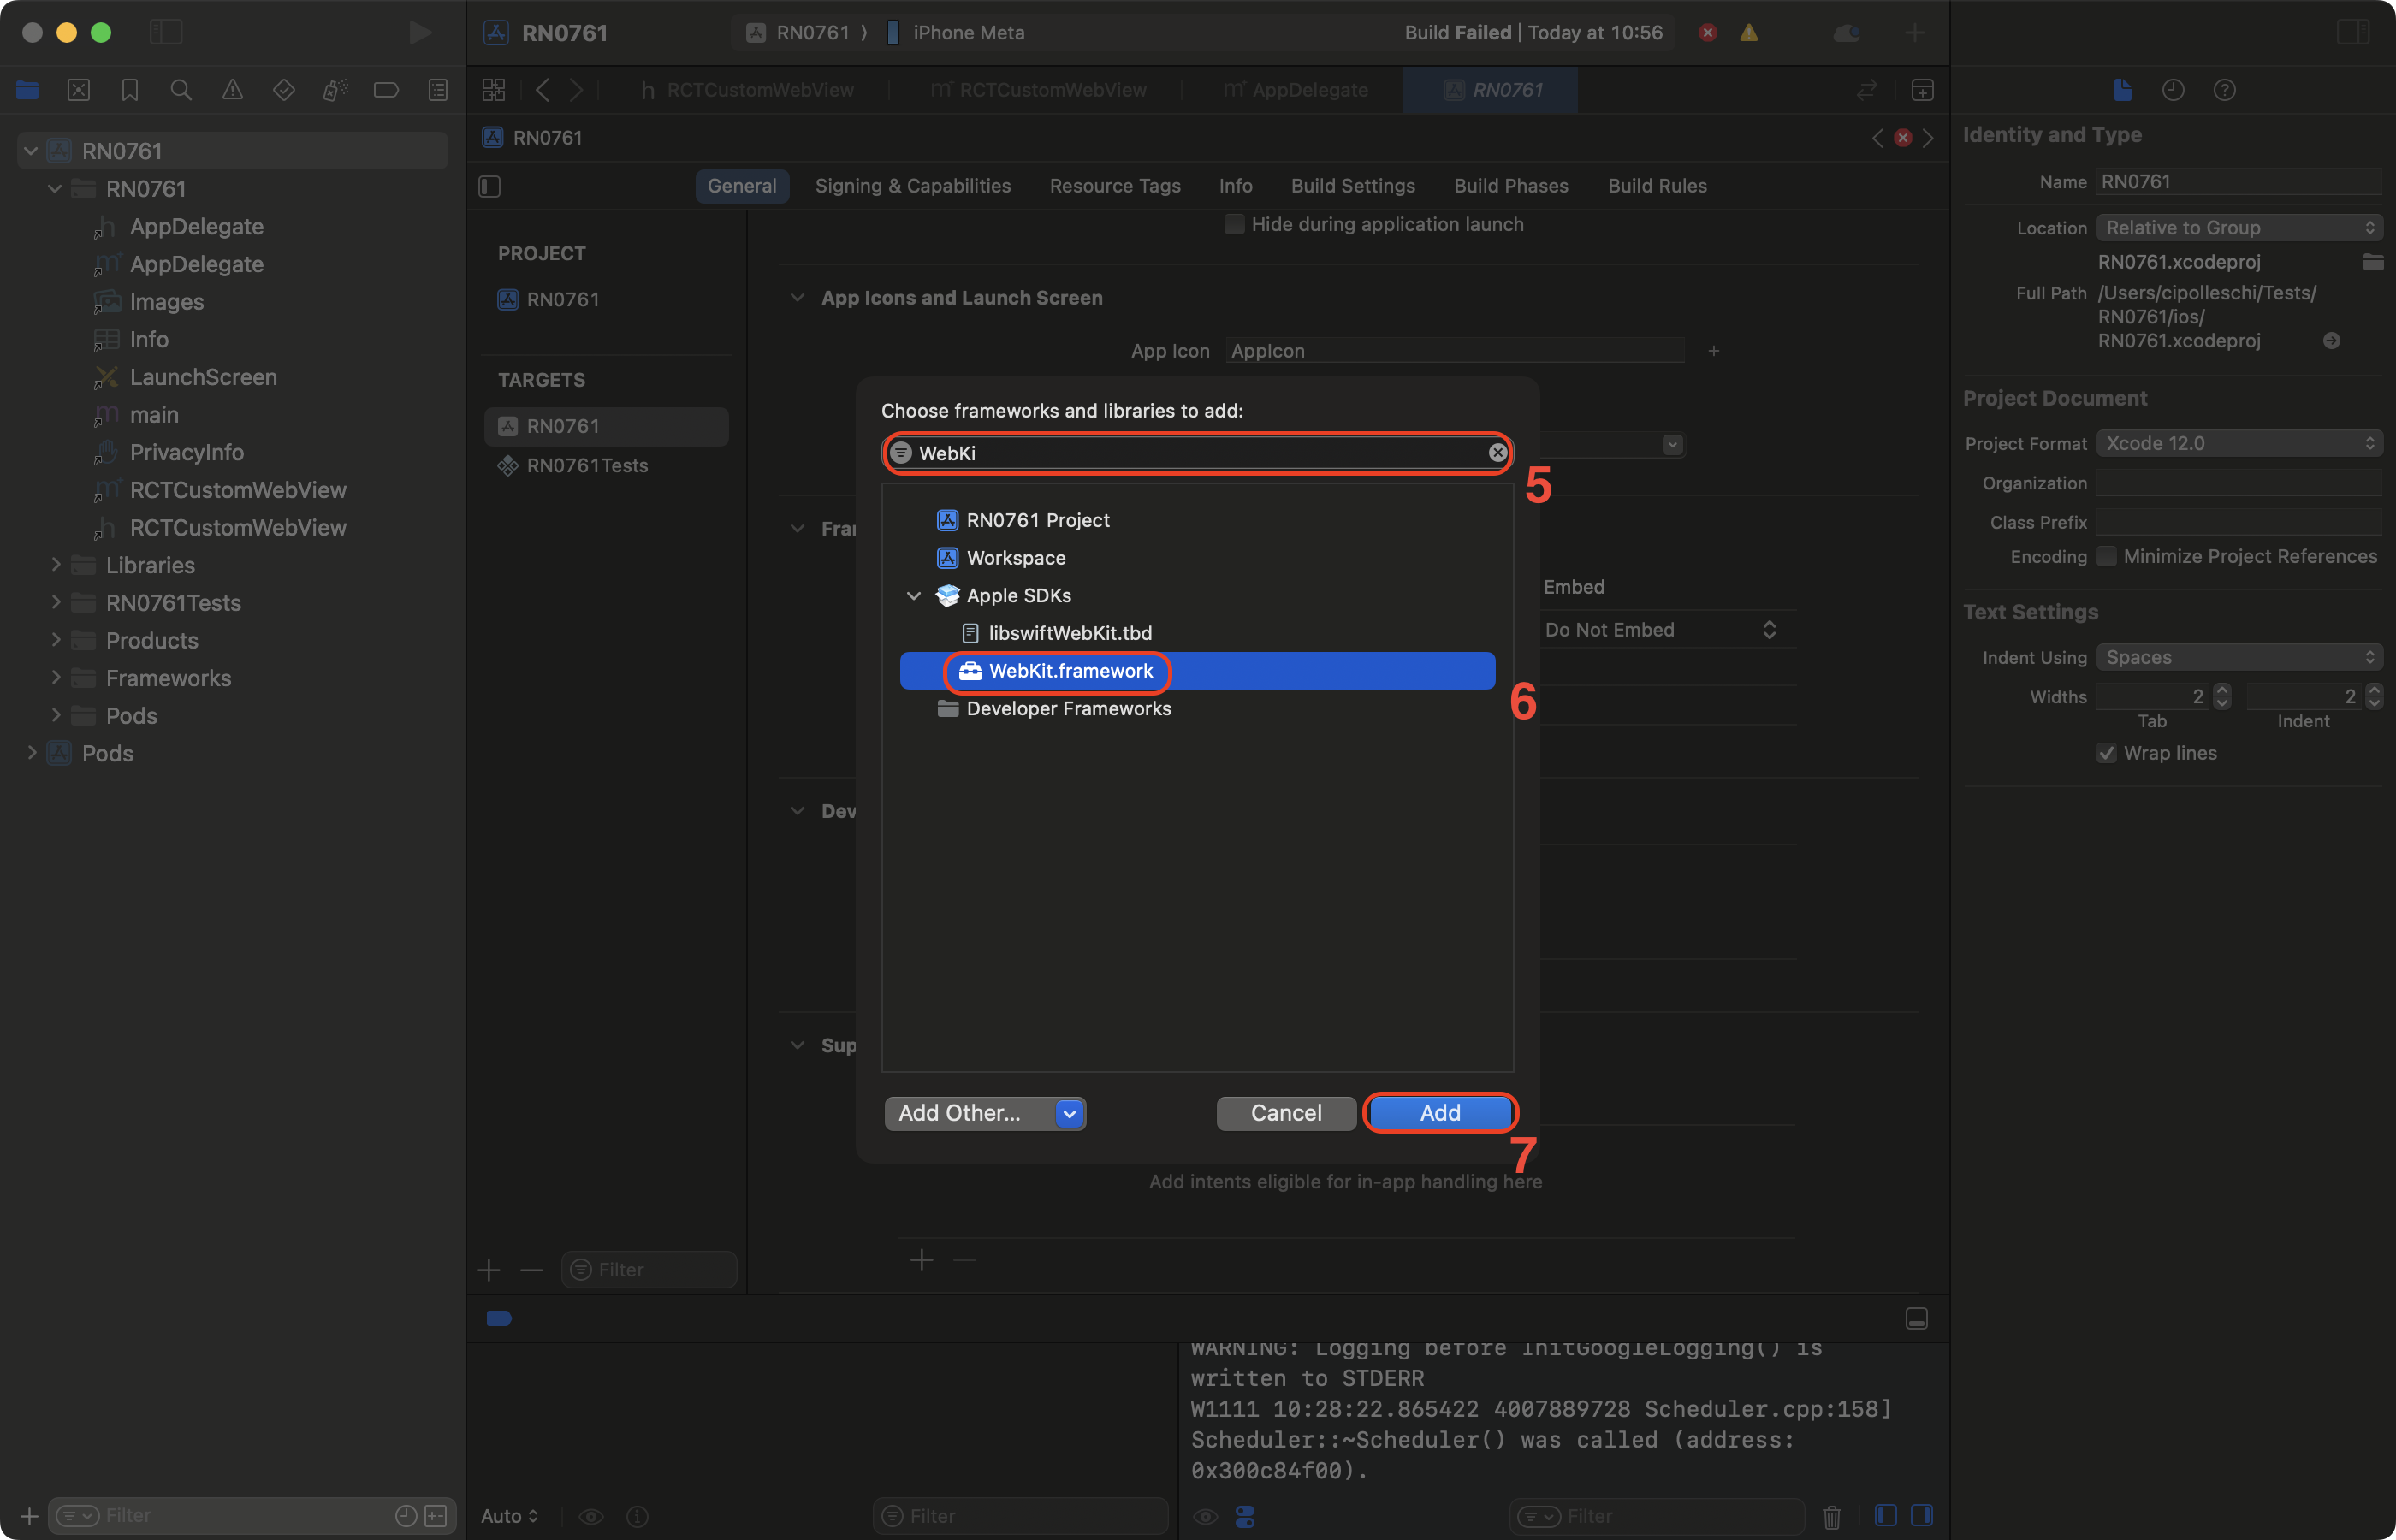
- 在 Xcode 中,点击你的项目
- 选择 app target
- 选择 General 标签页
- 向下滚动,直到找到 "Frameworks, Libraries, and Embedded Contents" 部分,然后点击
+按钮
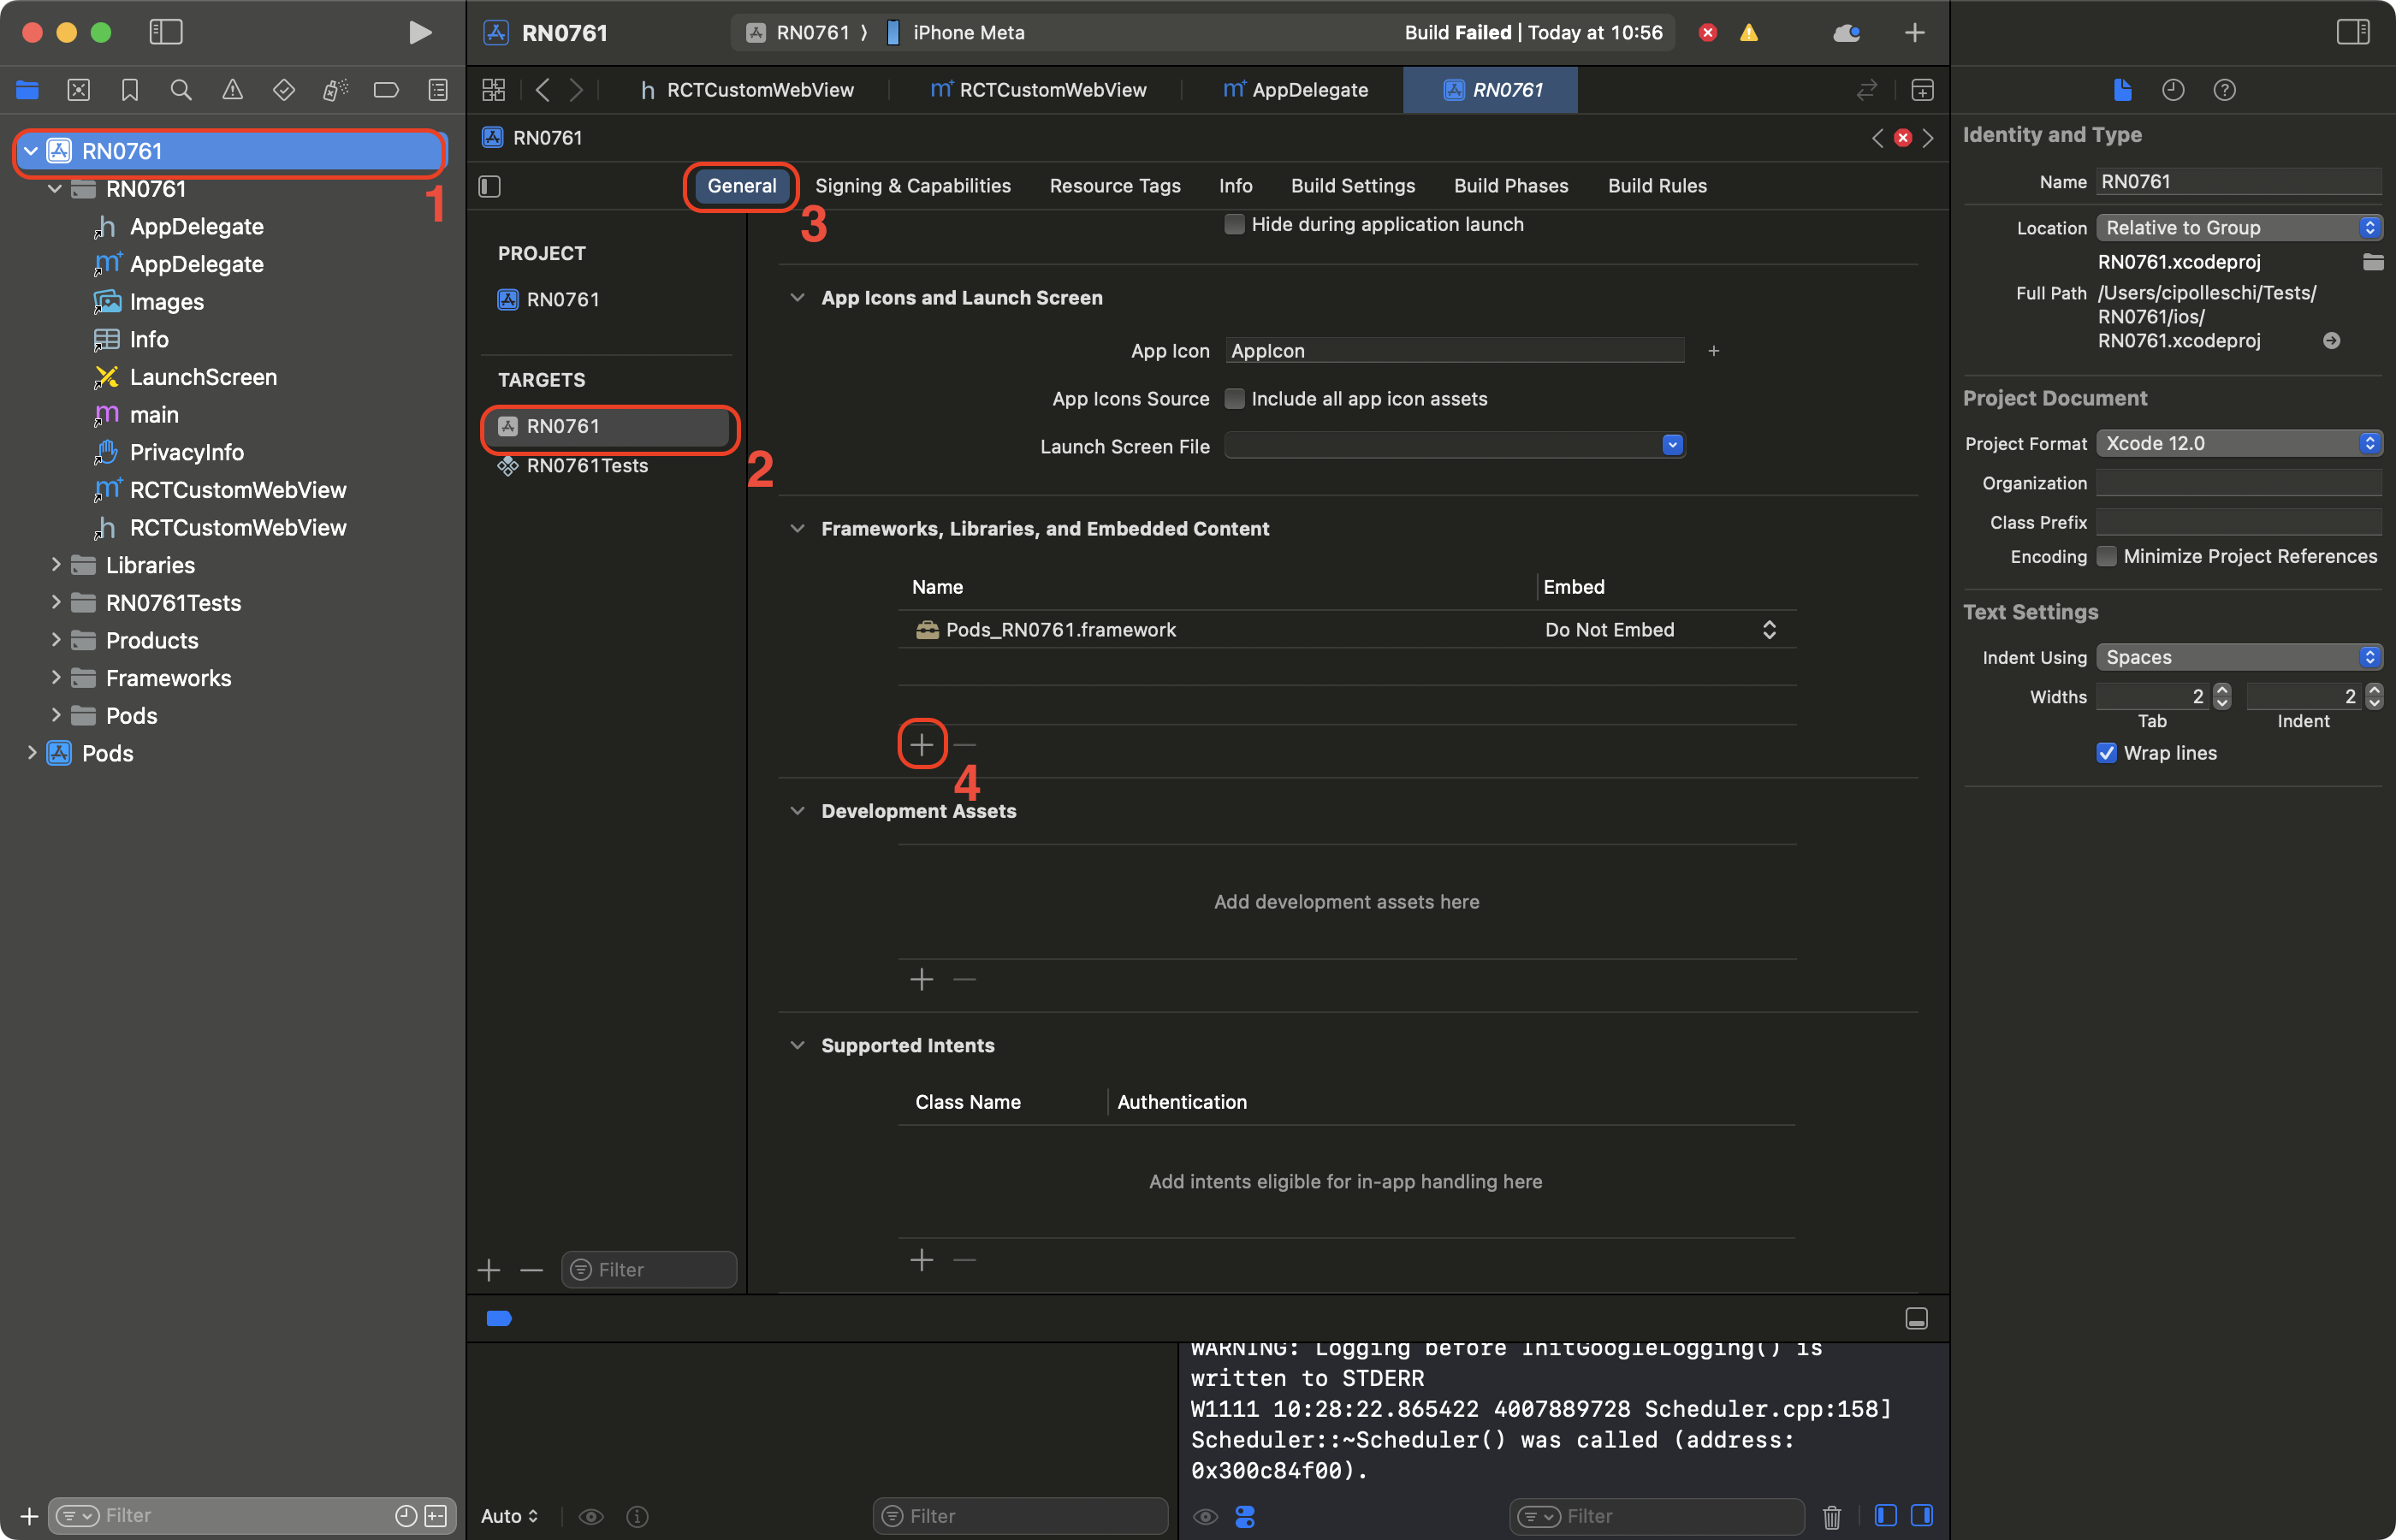
- 在搜索栏中筛选 WebKit
- 选择 WebKit 框架
- 点击 Add