与现有应用集成
React Native 非常适合从头开始开发新的移动应用。然而,它同样适合向现有的原生应用添加单一视图或用户流程。通过几个步骤,你可以添加基于 React Native 的新功能、屏幕、视图等。
具体步骤取决于你所针对的平台。
- Android(Java 和 Kotlin)
- iOS(Objective-C 和 Swift)
核心概念
将 React Native 组件集成到你的 Android 应用中的关键在于:
- 设置正确的目录结构。
- 安装必要的 NPM 依赖项。
- 将 React Native 添加到你的 Gradle 配置中。
- 为你的第一个 React Native 屏幕编写 TypeScript 代码。
- 使用
ReactActivity将 React Native 与你的 Android 代码集成。 - 通过运行打包器并查看应用实际运行效果来测试你的集成。
使用社区模板
在你按照本指南操作时,我们建议你将 React Native 社区模板 作为参考。该模板包含一个 最小化的 Android 应用,将帮助你理解如何将 React Native 集成到现有的 Android 应用中。
前提条件
请先按照设置开发环境和在不使用框架的情况下使用 React Native中的指南来配置用于构建 Android React Native 应用的开发环境。
本指南还假设你已经熟悉 Android 开发的基础知识,例如创建 Activity 和编辑 AndroidManifest.xml 文件。
1. 设置目录结构
为了确保顺利使用,请为你的集成 React Native 项目创建一个新文件夹,然后将你现有的 Android 项目移动到 /android 子文件夹中。
2. 安装 NPM 依赖项
进入根目录并运行以下命令:
curl -O https://raw.githubusercontent.com/react-native-community/template/refs/heads/0.84-stable/template/package.json
这会将社区模板中的 package.json 文件复制到你的项目中。
接下来,通过运行以下命令安装 NPM 包:
- npm
- Yarn
npm install
yarn install
安装过程会创建一个新的 node_modules 文件夹。此文件夹会存储构建项目所需的所有 JavaScript 依赖项。
将 node_modules/ 添加到你的 .gitignore 文件中(此处使用 社区默认文件)。
3. 将 React Native 添加到你的应用中
配置 Gradle
React Native 使用 React Native Gradle 插件来配置你的依赖项和项目设置。
首先,编辑你的 settings.gradle 文件,添加以下内容(如 社区模板所示):
// 配置用于自动链接的 React Native Gradle Settings 插件
pluginManagement { includeBuild("../node_modules/@react-native/gradle-plugin") }
plugins { id("com.facebook.react.settings") }
extensions.configure(com.facebook.react.ReactSettingsExtension){ ex -> ex.autolinkLibrariesFromCommand() }
// 如果使用 .gradle.kts 文件:
// extensions.configure<com.facebook.react.ReactSettingsExtension> { autolinkLibrariesFromCommand() }
includeBuild("../node_modules/@react-native/gradle-plugin")

// 在这里包含你现有的 Gradle 模块。
// include(":app")
然后,你需要打开顶层的 build.gradle,并包含这一行(如 社区模板所示):
buildscript {
    repositories {
        google()
        mavenCentral()
    }
    dependencies {
        classpath("com.android.tools.build:gradle:7.3.1")
+       classpath("com.facebook.react:react-native-gradle-plugin")
    }
}
这可确保 React Native Gradle 插件(RNGP)在你的项目中可用。
最后,将以下内容添加到你的应用的 build.gradle 文件中(它是另一个 build.gradle 文件,通常位于你的 app 文件夹中——你可以将 社区模板文件作为参考):
apply plugin: "com.android.application"
+apply plugin: "com.facebook.react"

repositories {
    mavenCentral()
}

dependencies {
    // 其他依赖项放在这里
+   // 注意:我们有意不在这里指定版本号,因为 RNGP 会负责处理它。
+   // 如果你不使用 RNGP,就必须手动指定版本。
+   implementation("com.facebook.react:react-android")
+   implementation("com.facebook.react:hermes-android")
}

+react {
+   // 启用自动链接所必需 - https://github.com/react-native-community/cli/blob/master/docs/autolinking.md
+   autolinkLibrariesWithApp()
+}
最后,打开你的应用 gradle.properties 文件并添加以下行(此处使用 社区模板文件作为参考):
+reactNativeArchitectures=armeabi-v7a,arm64-v8a,x86,x86_64
+newArchEnabled=true
+hermesEnabled=true
配置你的清单文件
首先,确保你在 AndroidManifest.xml 中拥有 Internet 权限:
<manifest xmlns:android="http://schemas.android.com/apk/res/android">

+   <uses-permission android:name="android.permission.INTERNET" />

    <application
      android:name=".MainApplication">
    </application>
</manifest>
然后,你需要在调试用的 AndroidManifest.xml 中启用明文流量:
<?xml version="1.0" encoding="utf-8"?>
<manifest xmlns:android="http://schemas.android.com/apk/res/android"
    xmlns:tools="http://schemas.android.com/tools">

    <application
+       android:usesCleartextTraffic="true"
+       tools:targetApi="28"
    />
</manifest>
照例,这里提供社区模板中的 AndroidManifest.xml 文件作为参考:主文件 和 调试文件。
这是必要的,因为你的应用将通过 HTTP 与本地打包器 Metro 通信。
请务必只将此配置添加到你的调试清单中。
4. 编写 TypeScript 代码
现在我们将真正修改原生 Android 应用,以集成 React Native。
首先要编写的代码,是为将要集成到应用中的新屏幕编写实际的 React Native 代码。
创建一个 index.js 文件
首先,在 React Native 项目的根目录中创建一个空的 index.js 文件。
index.js 是 React Native 应用的入口点,并且始终是必需的。它可以是一个很小的文件,用于 import 其他属于你的 React Native 组件或应用的文件,也可以包含它所需的全部代码。
我们的 index.js 应如下所示(此处使用 社区模板文件作为参考):
import {AppRegistry} from 'react-native';
import App from './App';

AppRegistry.registerComponent('HelloWorld', () => App);
创建一个 App.tsx 文件
让我们创建一个 App.tsx 文件。这是一个可以包含 JSX 表达式的 TypeScript 文件。它包含我们将集成到 Android 应用中的根 React Native 组件(链接):
import {type JSX} from 'react';
import {
  SafeAreaView,
  ScrollView,
  StatusBar,
  StyleSheet,
  Text,
  useColorScheme,
  View,
} from 'react-native';
import {
  Colors,
  DebugInstructions,
  Header,
  ReloadInstructions,
} from 'react-native/Libraries/NewAppScreen';

function App(): JSX.Element {
  const isDarkMode = useColorScheme() === 'dark';

  const backgroundStyle = {
    backgroundColor: isDarkMode ? Colors.darker : Colors.lighter,
  };

  return (
    <SafeAreaView style={backgroundStyle}>
      <StatusBar
        barStyle={isDarkMode ? 'light-content' : 'dark-content'}
        backgroundColor={backgroundStyle.backgroundColor}
      />
      <ScrollView
        contentInsetAdjustmentBehavior="automatic"
        style={backgroundStyle}>
        <Header />
        <View
          style={{
            backgroundColor: isDarkMode
              ? Colors.black
              : Colors.white,
            padding: 24,
          }}>
          <Text style={styles.title}>第一步</Text>
          <Text>
            编辑 <Text style={styles.bold}>App.tsx</Text> 以
            更改此屏幕并查看你的修改效果。
          </Text>
          <Text style={styles.title}>查看你的更改</Text>
          <ReloadInstructions />
          <Text style={styles.title}>调试</Text>
          <DebugInstructions />
        </View>
      </ScrollView>
    </SafeAreaView>
  );
}

const styles = StyleSheet.create({
  title: {
    fontSize: 24,
    fontWeight: '600',
  },
  bold: {
    fontWeight: '700',
  },
});

export default App;
这里是 社区模板文件作为参考。
5. 与你的 Android 代码集成
我们现在需要添加一些原生代码,以启动 React Native 运行时并告诉它渲染我们的 React 组件。
更新你的 Application 类
首先,我们需要按如下方式更新你的 Application 类,以正确初始化 React Native:
- Java
- Kotlin
package <your-package-here>;

import android.app.Application;
+import com.facebook.react.PackageList;
+import com.facebook.react.ReactApplication;
+import com.facebook.react.ReactHost;
+import com.facebook.react.ReactNativeHost;
+import com.facebook.react.ReactPackage;
+import com.facebook.react.defaults.DefaultNewArchitectureEntryPoint;
+import com.facebook.react.defaults.DefaultReactHost;
+import com.facebook.react.defaults.DefaultReactNativeHost;
+import com.facebook.soloader.SoLoader;
+import com.facebook.react.soloader.OpenSourceMergedSoMapping
+import java.util.List;

-class MainApplication extends Application {
+class MainApplication extends Application implements ReactApplication {
+ @Override
+ public ReactNativeHost getReactNativeHost() {
+   return new DefaultReactNativeHost(this) {
+     @Override
+     protected List<ReactPackage> getPackages() { return new PackageList(this).getPackages(); }
+     @Override
+     protected String getJSMainModuleName() { return "index"; }
+     @Override
+     public boolean getUseDeveloperSupport() { return BuildConfig.DEBUG; }
+     @Override
+     protected boolean isNewArchEnabled() { return BuildConfig.IS_NEW_ARCHITECTURE_ENABLED; }
+     @Override
+     protected Boolean isHermesEnabled() { return BuildConfig.IS_HERMES_ENABLED; }
+   };
+ }

+ @Override
+ public ReactHost getReactHost() {
+   return DefaultReactHost.getDefaultReactHost(getApplicationContext(), getReactNativeHost());
+ }

  @Override
  public void onCreate() {
    super.onCreate();
+   SoLoader.init(this, OpenSourceMergedSoMapping);
+   if (BuildConfig.IS_NEW_ARCHITECTURE_ENABLED) {
+     DefaultNewArchitectureEntryPoint.load();
+   }
  }
}
// package <your-package-here>

import android.app.Application
+import com.facebook.react.PackageList
+import com.facebook.react.ReactApplication
+import com.facebook.react.ReactHost
+import com.facebook.react.ReactNativeHost
+import com.facebook.react.ReactPackage
+import com.facebook.react.defaults.DefaultNewArchitectureEntryPoint.load
+import com.facebook.react.defaults.DefaultReactHost.getDefaultReactHost
+import com.facebook.react.defaults.DefaultReactNativeHost
+import com.facebook.soloader.SoLoader
+import com.facebook.react.soloader.OpenSourceMergedSoMapping

-class MainApplication : Application() {
+class MainApplication : Application(), ReactApplication {

+ override val reactNativeHost: ReactNativeHost =
+      object : DefaultReactNativeHost(this) {
+        override fun getPackages(): List<ReactPackage> = PackageList(this).packages
+        override fun getJSMainModuleName(): String = "index"
+        override fun getUseDeveloperSupport(): Boolean = BuildConfig.DEBUG
+        override val isNewArchEnabled: Boolean = BuildConfig.IS_NEW_ARCHITECTURE_ENABLED
+        override val isHermesEnabled: Boolean = BuildConfig.IS_HERMES_ENABLED
+      }

+ override val reactHost: ReactHost
+   get() = getDefaultReactHost(applicationContext, reactNativeHost)

  override fun onCreate() {
    super.onCreate()
+   SoLoader.init(this, OpenSourceMergedSoMapping)
+   if (BuildConfig.IS_NEW_ARCHITECTURE_ENABLED) {
+     load()
+   }
  }
}
和往常一样,这里可以参考社区模板文件中的 MainApplication.kt。
创建一个 ReactActivity
最后,我们需要创建一个新的 Activity,它将继承 ReactActivity 并承载 React Native 代码。这个 activity 将负责启动 React Native 运行时并渲染 React 组件。
- Java
- Kotlin
// package <your-package-here>;

import com.facebook.react.ReactActivity;
import com.facebook.react.ReactActivityDelegate;
import com.facebook.react.defaults.DefaultNewArchitectureEntryPoint;
import com.facebook.react.defaults.DefaultReactActivityDelegate;

public class MyReactActivity extends ReactActivity {

    @Override
    protected String getMainComponentName() {
        return "HelloWorld";
    }

    @Override
    protected ReactActivityDelegate createReactActivityDelegate() {
        return new DefaultReactActivityDelegate(this, getMainComponentName(), DefaultNewArchitectureEntryPoint.getFabricEnabled());
    }
}
// package <your-package-here>

import com.facebook.react.ReactActivity
import com.facebook.react.ReactActivityDelegate
import com.facebook.react.defaults.DefaultNewArchitectureEntryPoint.fabricEnabled
import com.facebook.react.defaults.DefaultReactActivityDelegate

class MyReactActivity : ReactActivity() {

    override fun getMainComponentName(): String = "HelloWorld"

    override fun createReactActivityDelegate(): ReactActivityDelegate =
        DefaultReactActivityDelegate(this, mainComponentName, fabricEnabled)
}
和往常一样,这里可以参考社区模板文件中的 MainActivity.kt。
每当你创建一个新的 Activity 时,都需要将其添加到你的 AndroidManifest.xml 文件中。你还需要将 MyReactActivity 的主题设置为 Theme.AppCompat.Light.NoActionBar(或任何非 ActionBar 主题),否则你的应用程序会在 React Native 屏幕顶部渲染一个 ActionBar:
<manifest xmlns:android="http://schemas.android.com/apk/res/android">

    <uses-permission android:name="android.permission.INTERNET" />

    <application
      android:name=".MainApplication">

+     <activity
+       android:name=".MyReactActivity"
+       android:label="@string/app_name"
+       android:theme="@style/Theme.AppCompat.Light.NoActionBar">
+     </activity>
    </application>
</manifest>
现在你的 activity 已经准备好运行一些 JavaScript 代码了。
6. 测试你的集成
你已经完成了将 React Native 集成到应用程序中的所有基本步骤。现在我们将启动 Metro bundler,把你的 TypeScript 应用代码构建成一个 bundle。Metro 的 HTTP 服务器会把开发环境中 localhost 上的 bundle 共享到模拟器或设备。这支持 热重载。
首先,你需要在项目根目录中创建一个 metro.config.js 文件,如下所示:
const {getDefaultConfig} = require('@react-native/metro-config');
module.exports = getDefaultConfig(__dirname);
你可以从社区模板文件中查看 metro.config.js 文件 作为参考。
一旦配置文件就位,你就可以运行 bundler。在项目根目录中运行以下命令:
- npm
- Yarn
npm start
yarn start
现在像平常一样构建并运行你的 Android 应用。
一旦你在应用中进入了由 React 驱动的 Activity,它应该会从开发服务器加载 JavaScript 代码并显示:

在 Android Studio 中创建发布构建
你也可以使用 Android Studio 来创建发布构建!这和为你之前已有的原生 Android 应用创建发布构建一样快。
React Native Gradle Plugin 会负责将 JS 代码打包到你的 APK/App Bundle 中。
如果你没有使用 Android Studio,可以使用以下命令创建发布构建:
cd android
# 对于 Release APK
./gradlew :app:assembleRelease
# 对于 Release AAB
./gradlew :app:bundleRelease
接下来呢?
到这里,你可以像往常一样继续开发你的应用。请参考我们的 调试 和 部署 文档,了解更多关于使用 React Native 的信息。
Key Concepts
The keys to integrating React Native components into your iOS application are to:
- Set up the correct directory structure.
- Install the necessary NPM dependencies.
- Adding React Native to your Podfile configuration.
- Writing the TypeScript code for your first React Native screen.
- Integrate React Native with your iOS code using a
RCTRootView. - Testing your integration by running the bundler and seeing your app in action.
Using the Community Template
While you follow this guide, we suggest you to use the React Native Community Template as reference. The template contains a minimal iOS app and will help you understanding how to integrate React Native into an existing iOS app.
Prerequisites
Follow the guide on setting up your development environment and using React Native without a framework to configure your development environment for building React Native apps for iOS.
This guide also assumes you're familiar with the basics of iOS development such as creating a UIViewController and editing the Podfile file.
1. Set up directory structure
To ensure a smooth experience, create a new folder for your integrated React Native project, then move your existing iOS project to the /ios subfolder.
2. Install NPM dependencies
Go to the root directory and run the following command:
curl -O https://raw.githubusercontent.com/react-native-community/template/refs/heads/0.84-stable/template/package.json
This will copy the package.json file from the Community template to your project.
Next, install the NPM packages by running:
- npm
- Yarn
npm install
yarn install
Installation process has created a new node_modules folder. This folder stores all the JavaScript dependencies required to build your project.
Add node_modules/ to your .gitignore file (here the Community default one).
3. Install Development tools
Command Line Tools for Xcode
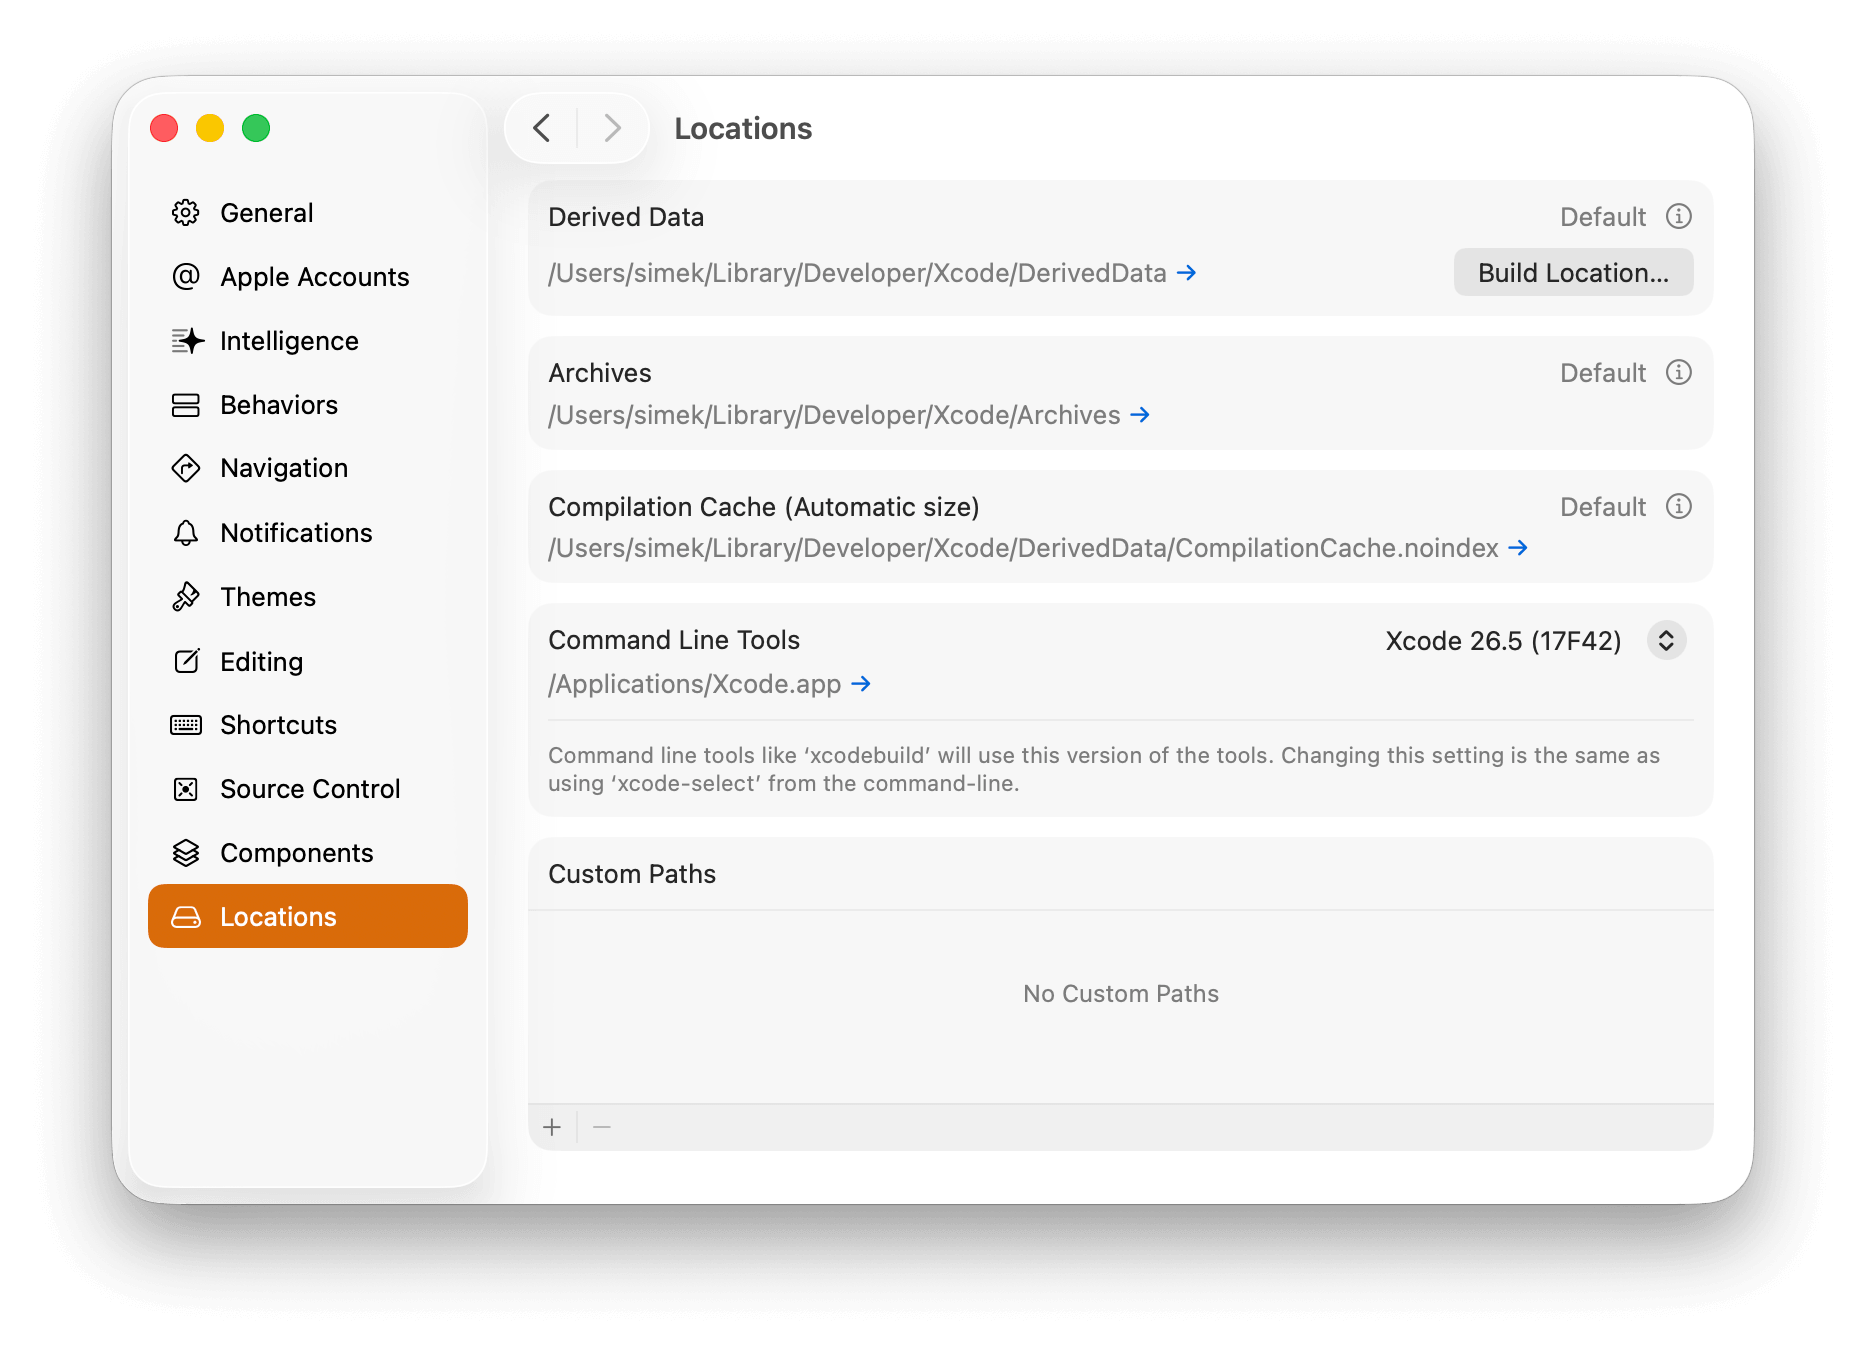
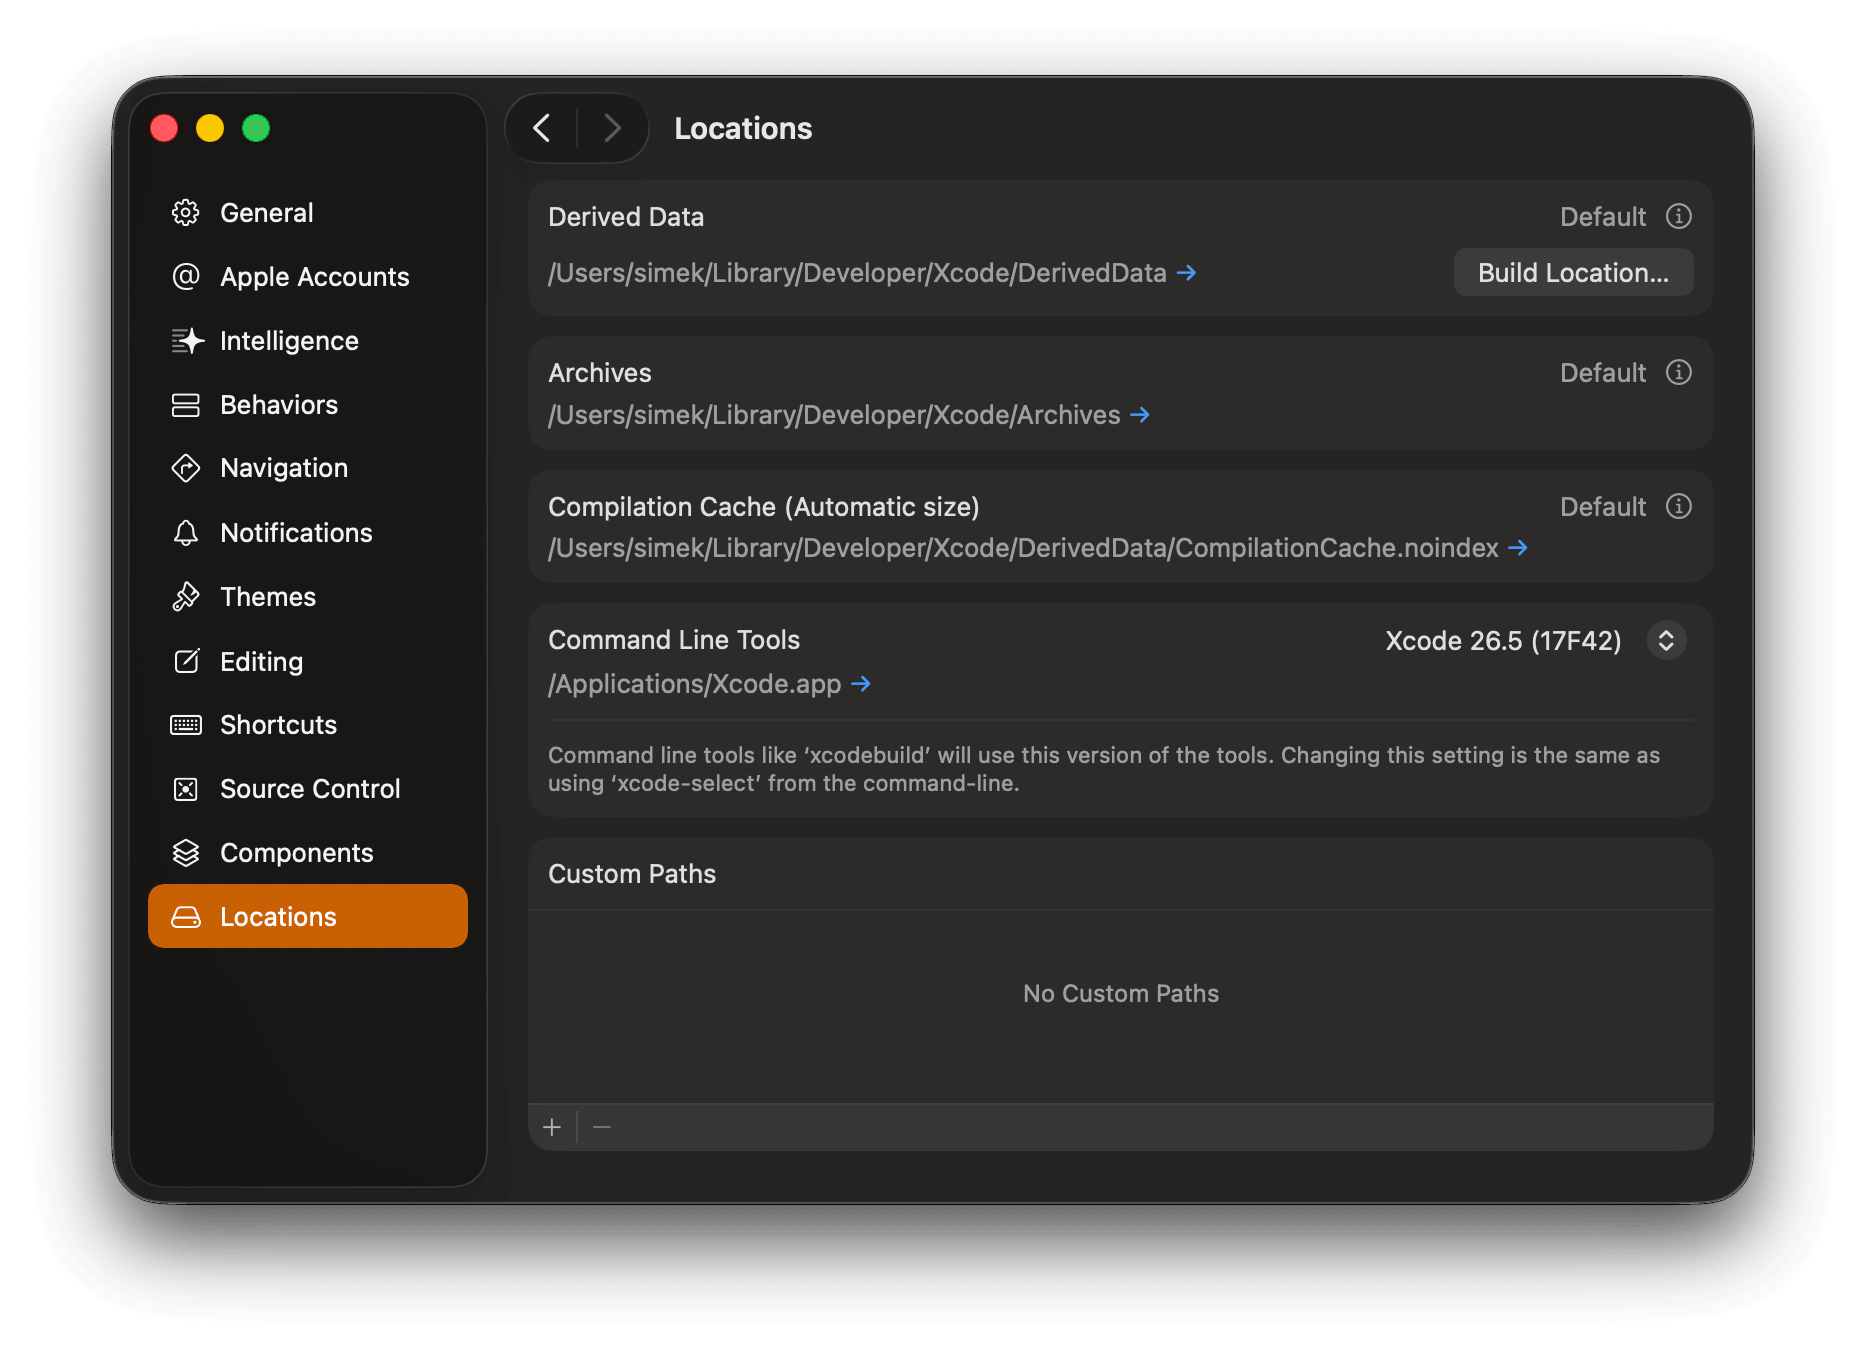
Install the Command Line Tools. Choose Settings... (or Preferences...) in the Xcode menu. Go to the Locations panel and install the tools by selecting the most recent version in the Command Line Tools dropdown.
CocoaPods
CocoaPods is a package management tool for iOS and macOS development. We use it to add the actual React Native framework code locally into your current project.
We recommend installing CocoaPods using Homebrew:
brew install cocoapods
4. Adding React Native to your app
Configuring CocoaPods
To configure CocoaPods, we need two files:
- A Gemfile that defines which Ruby dependencies we need.
- A Podfile that defines how to properly install our dependencies.
For the Gemfile, go to the root directory of your project and run this command
curl -O https://raw.githubusercontent.com/react-native-community/template/refs/heads/0.84-stable/template/Gemfile
This will download the Gemfile from the template.
If you created your project with Xcode 16, you need to update the Gemfile as it follows:
-gem 'cocoapods', '>= 1.13', '!= 1.15.0', '!= 1.15.1'
+gem 'cocoapods', '1.16.2'
gem 'activesupport', '>= 6.1.7.5', '!= 7.1.0'
-gem 'xcodeproj', '< 1.26.0'
+gem 'xcodeproj', '1.27.0'
Xcode 16 generates a project in a slightly different ways from previous versions of Xcode, and you need the latest CocoaPods and Xcodeproj gems to make it work properly.
Similarly, for the Podfile, go to the ios folder of your project and run
curl -O https://raw.githubusercontent.com/react-native-community/template/refs/heads/0.84-stable/template/ios/Podfile
Please use the Community Template as a reference point for the Gemfile and for the Podfile.
Remember to change this line.
Now, we need to run a couple of extra commands to install the Ruby gems and the Pods.
Navigate to the ios folder and run the following commands:
bundle install
bundle exec pod install
The first command will install the Ruby dependencies and the second command will actually integrate the React Native code in your application so that your iOS files can import the React Native headers.
5. Writing the TypeScript Code
Now we will actually modify the native iOS application to integrate React Native.
The first bit of code we will write is the actual React Native code for the new screen that will be integrated into our application.
Create a index.js file
First, create an empty index.js file in the root of your React Native project.
index.js is the starting point for React Native applications, and it is always required. It can be a small file that imports other file that are part of your React Native component or application, or it can contain all the code that is needed for it.
Our index.js should look as follows (here the Community template file as reference):
import {AppRegistry} from 'react-native';
import App from './App';

AppRegistry.registerComponent('HelloWorld', () => App);
Create a App.tsx file
Let's create an App.tsx file. This is a TypeScript file that can have JSX expressions. It contains the root React Native component that we will integrate into our iOS application (link):
import {type JSX} from 'react';
import {
  SafeAreaView,
  ScrollView,
  StatusBar,
  StyleSheet,
  Text,
  useColorScheme,
  View,
} from 'react-native';

import {
  Colors,
  DebugInstructions,
  Header,
  ReloadInstructions,
} from 'react-native/Libraries/NewAppScreen';

function App(): JSX.Element {
  const isDarkMode = useColorScheme() === 'dark';

  const backgroundStyle = {
    backgroundColor: isDarkMode ? Colors.darker : Colors.lighter,
  };

  return (
    <SafeAreaView style={backgroundStyle}>
      <StatusBar
        barStyle={isDarkMode ? 'light-content' : 'dark-content'}
        backgroundColor={backgroundStyle.backgroundColor}
      />
      <ScrollView
        contentInsetAdjustmentBehavior="automatic"
        style={backgroundStyle}>
        <Header />
        <View
          style={{
            backgroundColor: isDarkMode
              ? Colors.black
              : Colors.white,
            padding: 24,
          }}>
          <Text style={styles.title}>Step One</Text>
          <Text>
            Edit <Text style={styles.bold}>App.tsx</Text> to
            change this screen and see your edits.
          </Text>
          <Text style={styles.title}>See your changes</Text>
          <ReloadInstructions />
          <Text style={styles.title}>Debug</Text>
          <DebugInstructions />
        </View>
      </ScrollView>
    </SafeAreaView>
  );
}

const styles = StyleSheet.create({
  title: {
    fontSize: 24,
    fontWeight: '600',
  },
  bold: {
    fontWeight: '700',
  },
});

export default App;
Here is the Community template file as reference.
5. Integrating with your iOS code
We now need to add some native code in order to start the React Native runtime and tell it to render our React components.
Requirements
React Native initialization is now unbound to any specific part of an iOS app.
React Native can be initialized using a class called RCTReactNativeFactory, that takes care of handling the React Native lifecycle for you.
Once the class is initialized, you can either start a React Native view providing a UIWindow object, or you can ask for the factory to generate a UIView that you can load in any UIViewController.
In the following example, we will create a ViewController that can load a React Native view as it's view.
Create the ReactViewController
Create a new file from template (⌘+N) and choose the Cocoa Touch Class template.
Make sure to select UIViewController as the "Subclass of" field.
- ObjectiveC
- Swift
Now open the ReactViewController.m file and apply the following changes
#import "ReactViewController.h"
+#import <React/RCTBundleURLProvider.h>
+#import <RCTReactNativeFactory.h>
+#import <RCTDefaultReactNativeFactoryDelegate.h>
+#import <RCTAppDependencyProvider.h>


@interface ReactViewController ()

@end

+@interface ReactNativeFactoryDelegate: RCTDefaultReactNativeFactoryDelegate
+@end

-@implementation ReactViewController
+@implementation ReactViewController {
+  RCTReactNativeFactory *_factory;
+  id<RCTReactNativeFactoryDelegate> _factoryDelegate;
+}

 - (void)viewDidLoad {
     [super viewDidLoad];
     // Do any additional setup after loading the view.
+    _factoryDelegate = [ReactNativeFactoryDelegate new];
+    _factoryDelegate.dependencyProvider = [RCTAppDependencyProvider new];
+    _factory = [[RCTReactNativeFactory alloc] initWithDelegate:_factoryDelegate];
+    self.view = [_factory.rootViewFactory viewWithModuleName:@"HelloWorld"];
 }

@end

+@implementation ReactNativeFactoryDelegate
+
+- (NSURL *)sourceURLForBridge:(RCTBridge *)bridge
+{
+  return [self bundleURL];
+}
+
+- (NSURL *)bundleURL
+{
+#if DEBUG
+  return [RCTBundleURLProvider.sharedSettings jsBundleURLForBundleRoot:@"index"];
+#else
+  return [NSBundle.mainBundle URLForResource:@"main" withExtension:@"jsbundle"];
+#endif
+}

@end
Now open the ReactViewController.swift file and apply the following changes
import UIKit
+import React
+import React_RCTAppDelegate
+import ReactAppDependencyProvider

class ReactViewController: UIViewController {
+  var reactNativeFactory: RCTReactNativeFactory?
+  var reactNativeFactoryDelegate: RCTReactNativeFactoryDelegate?

  override func viewDidLoad() {
    super.viewDidLoad()
+    reactNativeFactoryDelegate = ReactNativeDelegate()
+    reactNativeFactoryDelegate!.dependencyProvider = RCTAppDependencyProvider()
+    reactNativeFactory = RCTReactNativeFactory(delegate: reactNativeFactoryDelegate!)
+    view = reactNativeFactory!.rootViewFactory.view(withModuleName: "HelloWorld")

  }
}

+class ReactNativeDelegate: RCTDefaultReactNativeFactoryDelegate {
+    override func sourceURL(for bridge: RCTBridge) -> URL? {
+      self.bundleURL()
+    }
+
+    override func bundleURL() -> URL? {
+      #if DEBUG
+      RCTBundleURLProvider.sharedSettings().jsBundleURL(forBundleRoot: "index")
+      #else
+      Bundle.main.url(forResource: "main", withExtension: "jsbundle")
+      #endif
+    }
+
+}
Presenting a React Native view in a rootViewController
Finally, we can present our React Native view. To do so, we need a new View Controller that can host a view in which we can load the JS content.
We already have the initial ViewController, and we can make it present the ReactViewController. There are several ways to do so, depending on your app. For this example, we assume that you have a button that presents React Native modally.
- ObjectiveC
- Swift
#import "ViewController.h"
+#import "ReactViewController.h"

@interface ViewController ()

@end

- @implementation ViewController
+@implementation ViewController {
+  ReactViewController *reactViewController;
+}

 - (void)viewDidLoad {
   [super viewDidLoad];
   // Do any additional setup after loading the view.
   self.view.backgroundColor = UIColor.systemBackgroundColor;
+  UIButton *button = [UIButton new];
+  [button setTitle:@"Open React Native" forState:UIControlStateNormal];
+  [button setTitleColor:UIColor.systemBlueColor forState:UIControlStateNormal];
+  [button setTitleColor:UIColor.blueColor forState:UIControlStateHighlighted];
+  [button addTarget:self action:@selector(presentReactNative) forControlEvents:UIControlEventTouchUpInside];
+  [self.view addSubview:button];

+  button.translatesAutoresizingMaskIntoConstraints = NO;
+  [NSLayoutConstraint activateConstraints:@[
+    [button.leadingAnchor constraintEqualToAnchor:self.view.leadingAnchor],
+    [button.trailingAnchor constraintEqualToAnchor:self.view.trailingAnchor],
+    [button.centerYAnchor constraintEqualToAnchor:self.view.centerYAnchor],
+    [button.centerXAnchor constraintEqualToAnchor:self.view.centerXAnchor],
+  ]];
 }

+- (void)presentReactNative
+{
+  if (reactViewController == NULL) {
+    reactViewController = [ReactViewController new];
+  }
+  [self presentViewController:reactViewController animated:YES];
+}

@end
import UIKit

class ViewController: UIViewController {

+  var reactViewController: ReactViewController?

  override func viewDidLoad() {
    super.viewDidLoad()
    // Do any additional setup after loading the view.
    self.view.backgroundColor = .systemBackground

+    let button = UIButton()
+    button.setTitle("Open React Native", for: .normal)
+    button.setTitleColor(.systemBlue, for: .normal)
+    button.setTitleColor(.blue, for: .highlighted)
+    button.addAction(UIAction { [weak self] _ in
+      guard let self else { return }
+      if reactViewController == nil {
+       reactViewController = ReactViewController()
+      }
+      present(reactViewController!, animated: true)
+    }, for: .touchUpInside)
+    self.view.addSubview(button)
+
+    button.translatesAutoresizingMaskIntoConstraints = false
+    NSLayoutConstraint.activate([
+      button.leadingAnchor.constraint(equalTo: self.view.leadingAnchor),
+      button.trailingAnchor.constraint(equalTo: self.view.trailingAnchor),
+      button.centerXAnchor.constraint(equalTo: self.view.centerXAnchor),
+      button.centerYAnchor.constraint(equalTo: self.view.centerYAnchor),
+    ])
  }
}
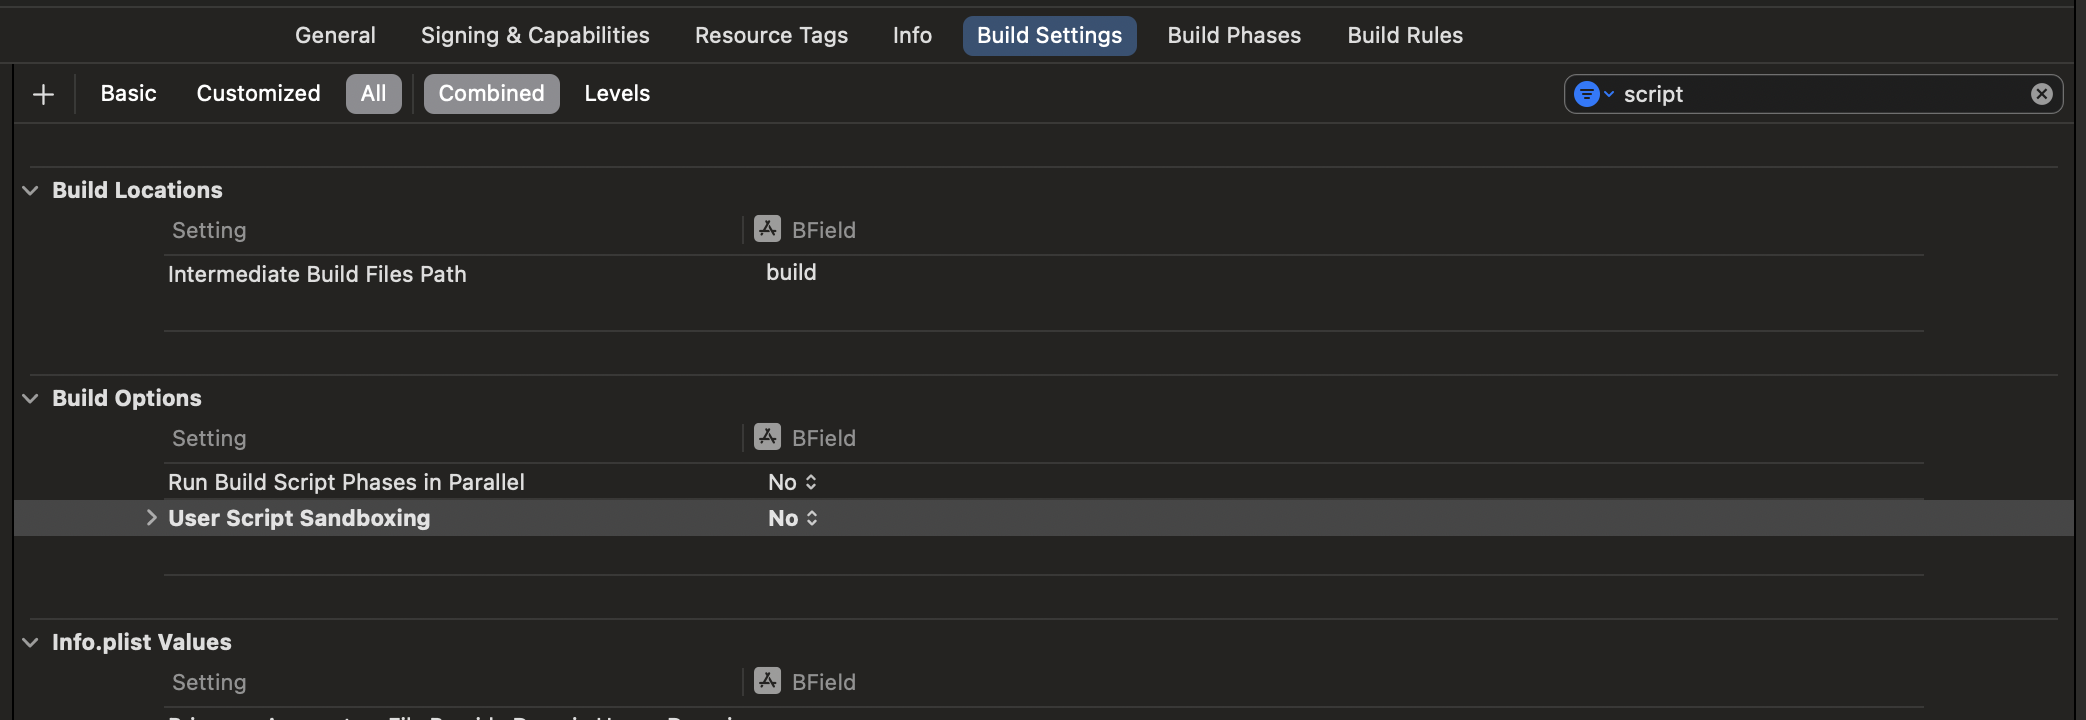
Make sure to disable the Sandbox scripting. To achieve this, in Xcode, click on your app, then on build settings. Filter for script and set the User Script Sandboxing to NO. This step is needed to properly switch between the Debug and Release version of the Hermes engine that we ship with React Native.
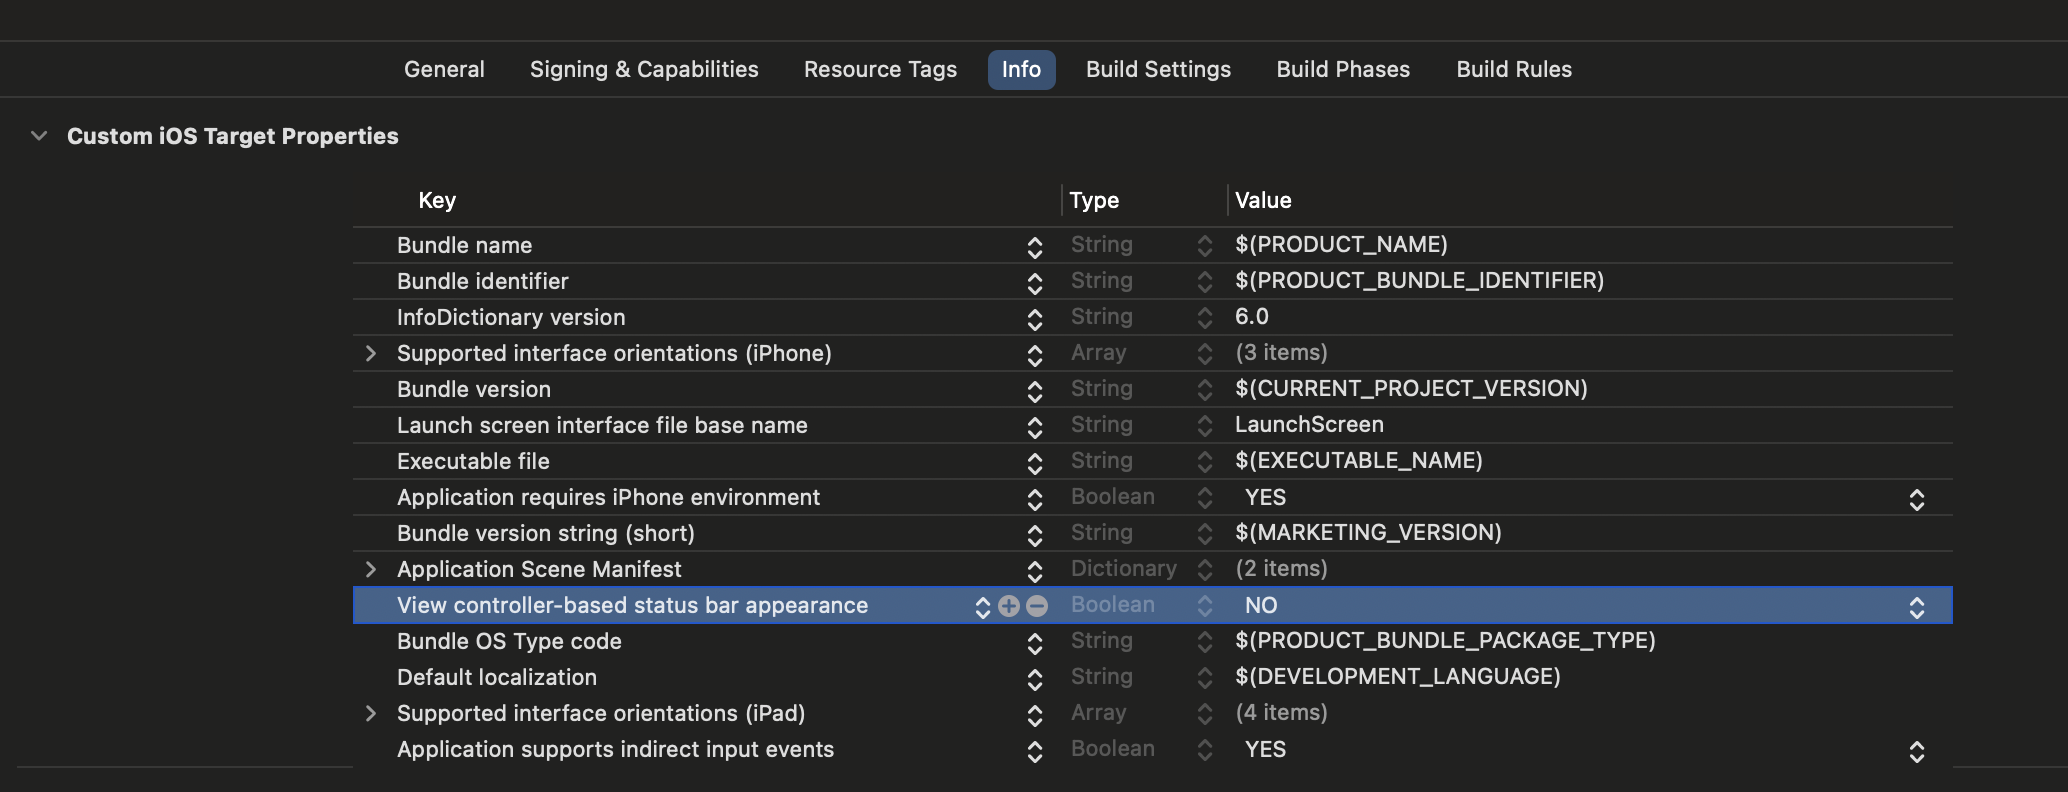
Finally, make sure to add the UIViewControllerBasedStatusBarAppearance key into your Info.plist file, with value of NO.
6. Test your integration
You have completed all the basic steps to integrate React Native with your application. Now we will start the Metro bundler to build your TypeScript application code into a bundle. Metro's HTTP server shares the bundle from localhost on your developer environment to a simulator or device. This allows for hot reloading.
First, you need to create a metro.config.js file in the root of your project as follows:
const {getDefaultConfig} = require('@react-native/metro-config');
module.exports = getDefaultConfig(__dirname);
You can checkout the metro.config.js file from the Community template file as reference.
Then, you need to create a .watchmanconfig file in the root of your project. The file must contain an empty json object:
echo {} > .watchmanconfig
Once you have the configuration file in place, you can run the bundler. Run the following command in the root directory of your project:
- npm
- Yarn
npm start
yarn start
Now build and run your iOS app as normal.
Once you reach your React-powered Activity inside the app, it should load the JavaScript code from the development server and display:

Creating a release build in Xcode
You can use Xcode to create your release builds too! The only additional step is to add a script that is executed when the app is built to package your JS and images into the iOS application.
- In Xcode, select your application
- Click on
Build Phases - Click on the
+in the top left corner and selectNew Run Script Phase - Click on the
Run Scriptline and rename the Script toBundle React Native code and images - Paste in the text box the following script
set -e

WITH_ENVIRONMENT="$REACT_NATIVE_PATH/scripts/xcode/with-environment.sh"
REACT_NATIVE_XCODE="$REACT_NATIVE_PATH/scripts/react-native-xcode.sh"

/bin/sh -c "$WITH_ENVIRONMENT $REACT_NATIVE_XCODE"
- Drag and drop the script before the one called
[CP] Embed Pods Frameworks.
Now, if you build your app for Release, it will work as expected.
7. Passing initial props to the React Native view
In some case, you'd like to pass some information from the Native app to JavaScript. For example, you might want to pass the user id of the currently logged user to React Native, together with a token that can be used to retrieve information from a database.
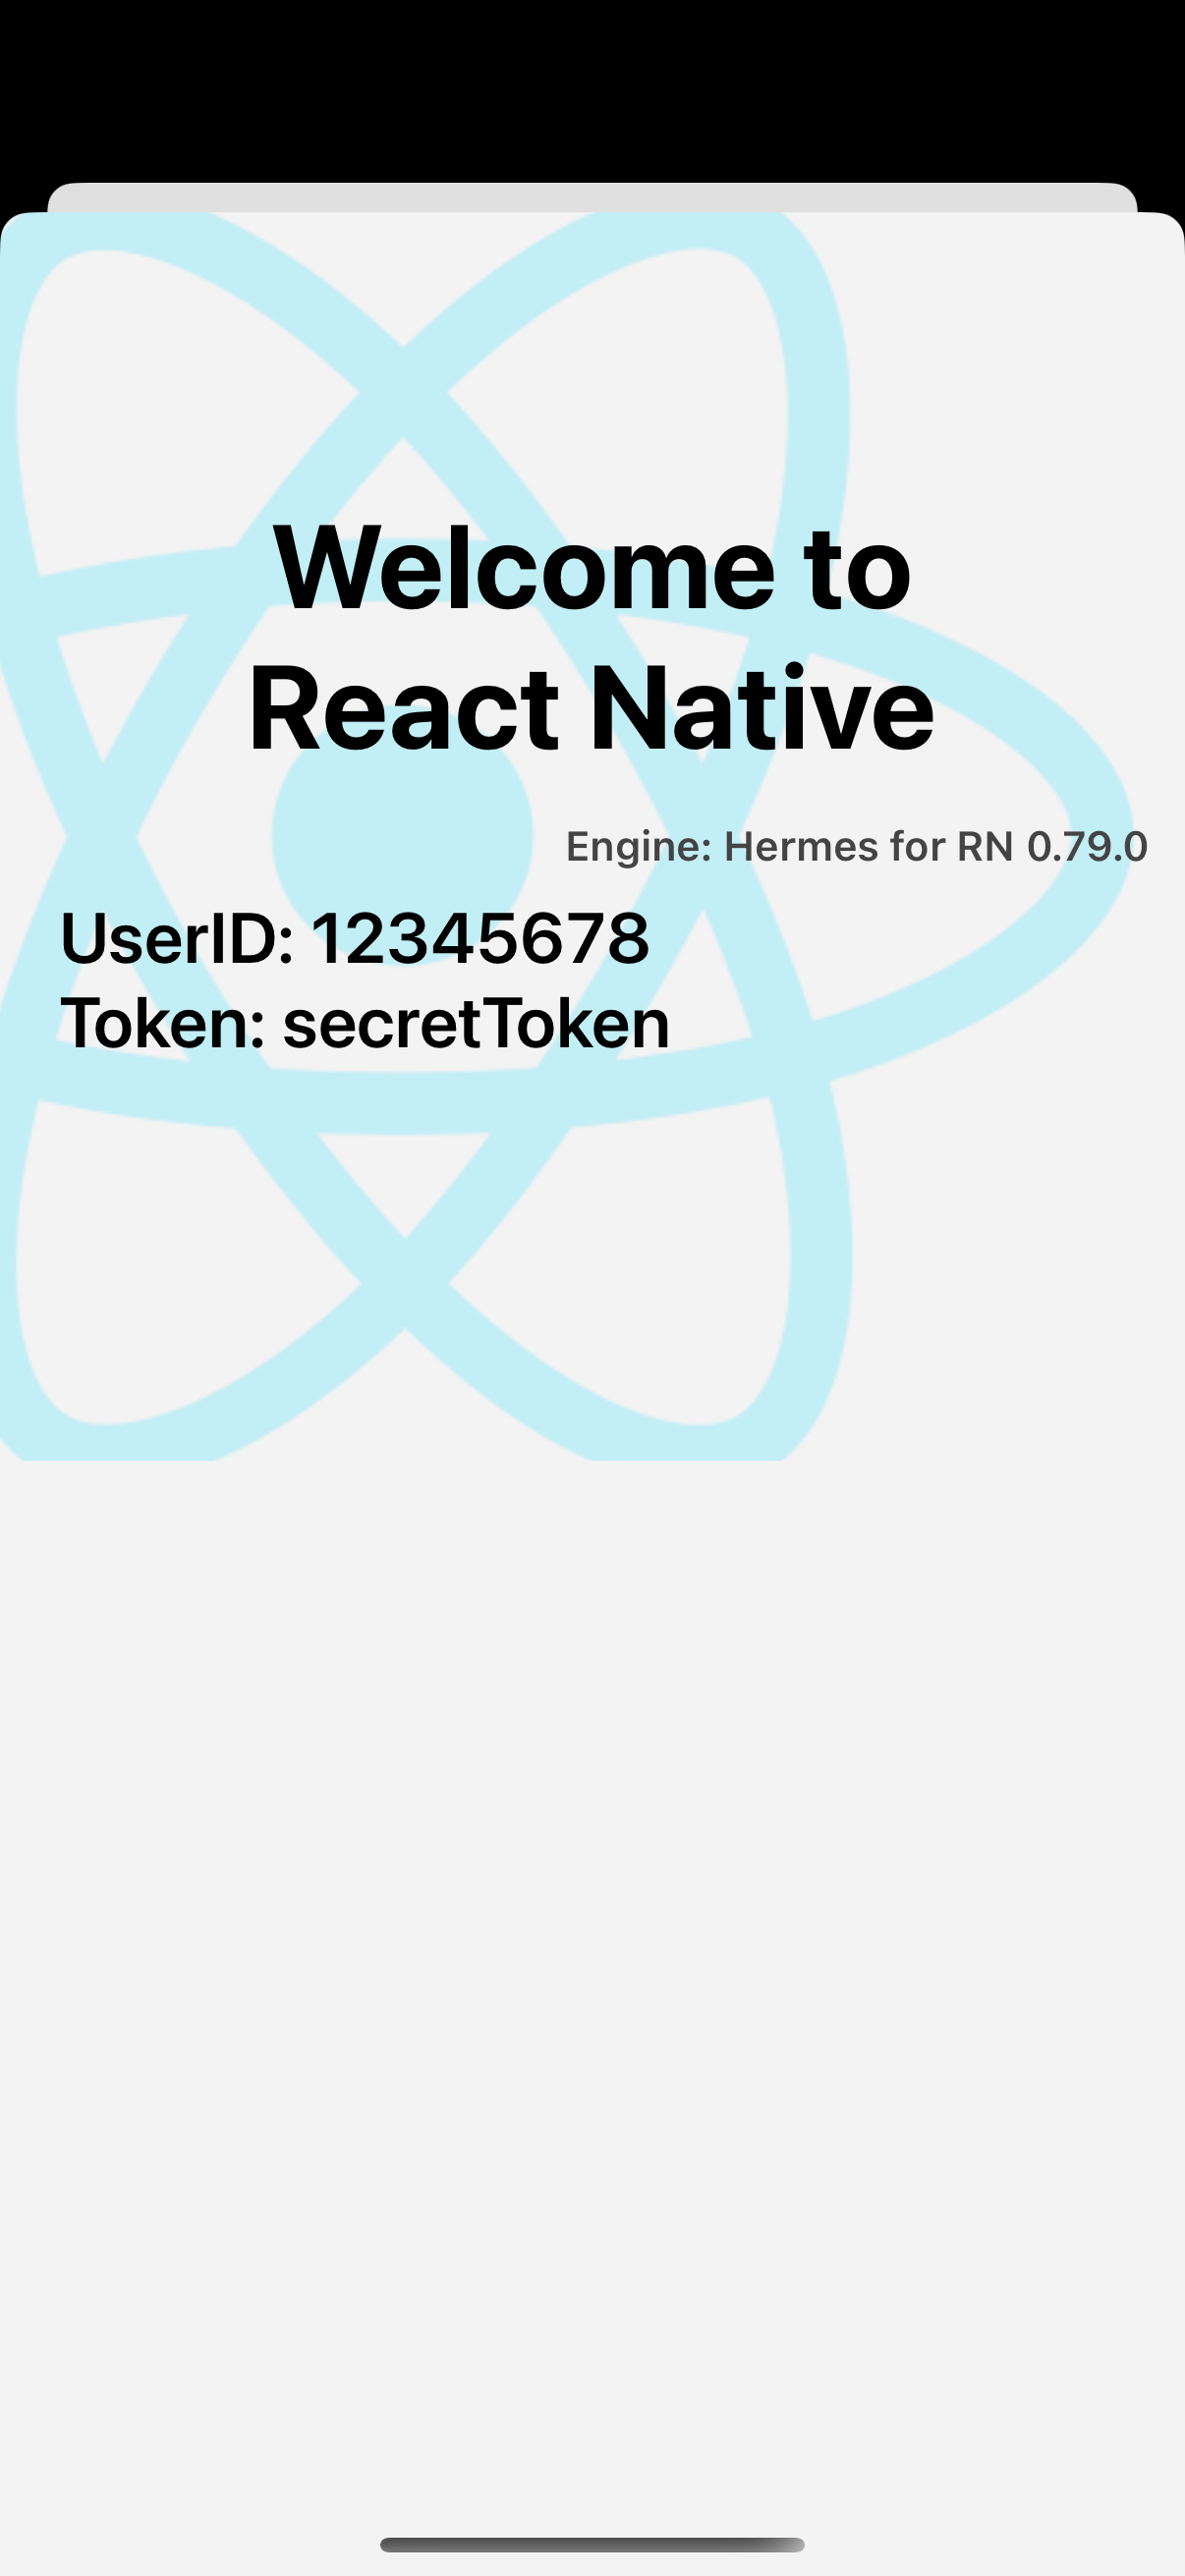
This is possible by using the initialProperties parameter of the view(withModuleName:initialProperty) overload of the RCTReactNativeFactory class. The following steps shows you how to do it.
Update the App.tsx file to read the initial properties.
Open the App.tsx file and add the following code:
import {
  Colors,
  DebugInstructions,
  Header,
  ReloadInstructions,
} from 'react-native/Libraries/NewAppScreen';

-function App(): React.JSX.Element {
+function App(props): React.JSX.Element {
  const isDarkMode = useColorScheme() === 'dark';

  const backgroundStyle = {
    backgroundColor: isDarkMode ? Colors.darker : Colors.lighter,
  };

  return (
    <SafeAreaView style={backgroundStyle}>
      <StatusBar
        barStyle={isDarkMode ? 'light-content' : 'dark-content'}
        backgroundColor={backgroundStyle.backgroundColor}
      />
      <ScrollView
        contentInsetAdjustmentBehavior="automatic"
        style={backgroundStyle}>
        <Header />
-       <View
-         style={{
-           backgroundColor: isDarkMode
-             ? Colors.black
-             : Colors.white,
-           padding: 24,
-         }}>
-         <Text style={styles.title}>Step One</Text>
-         <Text>
-           Edit <Text style={styles.bold}>App.tsx</Text> to
-           change this screen and see your edits.
-         </Text>
-         <Text style={styles.title}>See your changes</Text>
-         <ReloadInstructions />
-         <Text style={styles.title}>Debug</Text>
-         <DebugInstructions />
+         <Text style={styles.title}>UserID: {props.userID}</Text>
+         <Text style={styles.title}>Token: {props.token}</Text>
        </View>
      </ScrollView>
    </SafeAreaView>
  );
}

const styles = StyleSheet.create({
  title: {
    fontSize: 24,
    fontWeight: '600',
+   marginLeft: 20,
  },
  bold: {
    fontWeight: '700',
  },
});

export default App;
These changes will tell React Native that your App component is now accepting some properties. The RCTreactNativeFactory will take care of passing them to the component when it's rendered.
Update the Native code to pass the initial properties to JavaScript.
- ObjectiveC
- Swift
Modify the ReactViewController.mm to pass the initial properties to JavaScript.
 - (void)viewDidLoad {
   [super viewDidLoad];
   // Do any additional setup after loading the view.

   _factoryDelegate = [ReactNativeFactoryDelegate new];
   _factoryDelegate.dependencyProvider = [RCTAppDependencyProvider new];
   _factory = [[RCTReactNativeFactory alloc] initWithDelegate:_factoryDelegate];
-  self.view = [_factory.rootViewFactory viewWithModuleName:@"HelloWorld"];
+  self.view = [_factory.rootViewFactory viewWithModuleName:@"HelloWorld" initialProperties:@{
+    @"userID": @"12345678",
+    @"token": @"secretToken"
+  }];
}
Modify the ReactViewController.swift to pass the initial properties to the React Native view.
  override func viewDidLoad() {
    super.viewDidLoad()
    reactNativeFactoryDelegate = ReactNativeDelegate()
    reactNativeFactoryDelegate!.dependencyProvider = RCTAppDependencyProvider()
    reactNativeFactory = RCTReactNativeFactory(delegate: reactNativeFactoryDelegate!)
-   view = reactNativeFactory!.rootViewFactory.view(withModuleName: "HelloWorld")
+   view = reactNativeFactory!.rootViewFactory.view(withModuleName: "HelloWorld" initialProperties: [
+     "userID": "12345678",
+     "token": "secretToken"
+])

  }
}
- Run your app once again. You should see the following screen after you present the
ReactViewController:
Now what?
At this point you can continue developing your app as usual. Refer to our debugging and deployment docs to learn more about working with React Native.